The Plans module features a robust set of markup tools, allowing you to visually annotate drawings with notes, shapes, and photos to highlight specific tasks or field issues. The markup toolbar appears at the bottom of your screen whenever you open a sheet directly in the Plans module, or when attaching a drawing to an RFI, Submittal, Change Order, or Punch List.
AI-Powered Auto-Scaling - Linarc automatically detects the drawing's scale. If needed, you can manually recalibrate the sheet to override the auto-detected values. Once the scale is set, the tool automatically calculates and displays accurate dimensions directly on the sheet whenever you apply a length or area markup.
Visibility & Sharing Rules:
- Within the Plans Module: Markups are private to the creator by default. You can share them with specific team members and apply custom access levels to restrict visibility.
- Within Project Documents: Markups added to a sheet while attaching it to an RFI, Submittal, Change Order, or Punch List are visible to anyone who has access to that specific document.
Viewing Markups - When you open a plan sheet from the Plans module, it opens as a clean draft without any previous markups, ready for new annotations. You can use the drop-down menu at the top left to select and view a specific markup, or you can choose to overlay multiple existing markups to view them simultaneously.
Adding & Editing Markups - Using the markup toolbar at the bottom of the drawing, you can easily compose new annotations from scratch or append new elements to existing markups before saving your changes.
- To place identical annotations in various locations, simply copy and paste an existing markup and drag the duplicate to your desired spot.
To open a plansheet
- Click the main menu at the top-left
- Select 'Plansheets' under 'Documentation' from the main menu drop-down
- Click 'Plansheets' on the left
- Click the thumbnail of the plan sheet you want to open
Start with a clean sheet: To add a new markup to a clean plan sheet, select 'Draft' from the second drop-down menu at the top left.
Add to an existing markup: To add new elements to a previously saved markup, select its label from the same drop-down menu. Alternatively, you can click 'Load Markup' at the top right and select the existing markup you want to build upon.
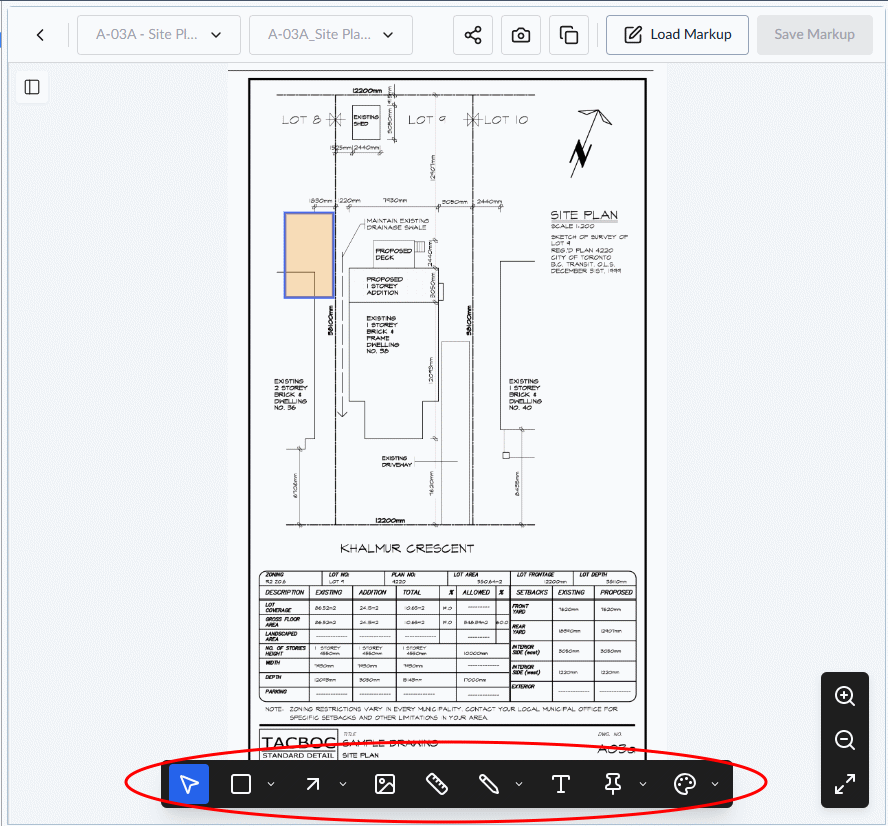
The toolbar contains the following tools to create different types of markup elements on the drawing:
 | - | Move the plan drawing across the screen, which is especially useful for focusing on specific details after zooming in. |
 | - | Highlight specific areas using a rectangle, ellipse, polygonal or cloud shape. You can customize the color, resize, rotate, and reposition these items. All area markups automatically display the dimensions of the enclosed space based on the sheet's drawing scale. See Mark areas and Mark an Area with Polygonal Shape for more guidance. |
 | - | Draw lines or arrows to point to specific locations or items. You can resize, rotate, and reposition them anywhere on the drawing. See Add Lines and Arrows for more guidance. |
 | - | Pin photos or images directly to the plan sheet. See Attach photos to markups for more guidance. |
 | - | Measure the distance between any two points on the drawing. This ruler tool automatically applies the sheet's saved drawing scale to provide accurate length markups. See Add Length Measurements for more guidance. |
 | - | Use the pencil or brush tools to draw freehand shapes and annotations or highlight specific areas or measurements/notes on the drawing with customizable color and transparency. See Create a free-form/freehand markup and Highlight Areas, Dimensions and Notes for more guidance. |
 | - | Insert text notes and comments using a fixed-size or adaptive text box. You can easily customize the font size and text color to suit your needs. See Insert Text Notes for more guidance. |
 | - | Place location identifier icons directly onto the plan sheet. See Mark Location Identifiers for more details. |
 | - | Use the main color palette in the toolbar to configure the stroke color, fill color, and transparency for your markups. For quick adjustments, you can also customize individual elements using the context palette that appears directly next to each markup. |
Each markup element you add is created as a layer over the plan sheet. Once you publish a markup, the layers are grouped and saved with a markup name you specify.
- The layer editor on the left shows the list of all element layers in the currently created/viewed markup. While creating a markup, you can rename the layers, shortly describing them.
- Click the
 icon in the top left to open the layer editor if it is not already open
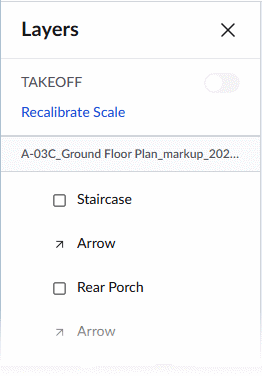
- Click the element label in the Layer Editor to instantly highlight the markup on the plan sheet, along with its associated measurements.
- Click on the element label to enter a new label if necessary, to keep your layers organized
- Hover your mouse over a layer to reveal the following options:
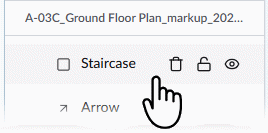
- Use the
 icon to protect the element from accidental deletion
 - Use the
 icon to show or hide the layer
 - Click the
 icon to remove an element added by mistake
 - Once you are done with the markup elements, click 'Save' on the top right to save the layer group as a markup. See Publish Markups for more details
Was this article helpful?
That’s Great!
Thank you for your feedback
Sorry! We couldn't be helpful
Thank you for your feedback
Feedback sent
We appreciate your effort and will try to fix the article