Linarc features a powerful and intuitive scheduler that enables you to easily set up a comprehensive WBS-based project delivery plan, manage the overall project schedule, and track the progress of tasks.
- General Contractor - The 'Master Schedule' lets general contractors create a comprehensive WBS-based schedule for their projects. You can add all schedule items like phases, deliverables, work packages, tasks, and activities as a hierarchical structure and in the order of execution. Alternatively, you can create a schedule using popular scheduler software like Oracle Primavera, MS Project, or MS Excel and import it to a project.
The GC can assign the deliverables, work items, and tasks to relevant subcontractors (including themselves, for self-performed work), depending on the nature of the work.
- Subcontractor - The 'Contractor Schedule' lets subcontractors/trade contractors/specialty contractors receive the work items assigned by the general contractor, break down the assigned tasks as sub-tasks and activities and push them to the field, track progress, and more.
Each task entry can be defined with key details such as planned start date, duration, dependencies on predecessor tasks, planned production quantity, assignee, location, and more. The intelligent built-in algorithms dynamically calculate crucial parameters like the critical path, early and late start/end dates, delays, slack, and more based on task progress and interdependencies. This provides project managers with a real-time, comprehensive overview of the project’s status, empowering them to evaluate schedule health, anticipate delays, and implement corrective measures to keep the project on track.
Scheduler Views: The grid screen of the schedule planner shows the list of WBS elements as a hierarchical tree structure with their details and parameters. You can also view and manage the schedule using Gantt charts and calendar views. This article explains the mostly used grid screen. See Schedule Views to learn more about other available views.
Custom Columns: In addition to standard fields, the scheduler grid can be tailored to the project's unique scope or company policies by adding custom columns. These columns enable you to capture specific details about scheduled items, complementing the standard columns available by default. See Custom Fields in the Scheduler - Overview to learn more.
Grid Customization: The feature-rich grid also allows you to customize the view with the following advanced features:
- Column Selection - The grid opens with the default columns. You can add or remove columns as required. Click here to learn more.
- Filter Options – Customize filters or sets of filters to streamline the sorting and filtering of entries. For more information, refer Setup Filters and Filter Groups.
- Groups – Organize entries by sorting them into nested groups using specific parameters. This feature enables easy arrangement and helps identify key items without navigating through extensive lists. For setup instructions, see Configure Groups of Grid Elements.
- Views – Design personalized grids with pre-applied filters and groupings to focus on relevant items for specific purposes. Each view you create appears as a tab, allowing seamless switching between views. You can also share your views with others or access views that have been shared with you. For more details, see Manage Grid Views.
The scheduler includes task-specific conversations, enabling real-time, context-focused chats with team members and contractors involved in a task. You can start a chat for any task, add participants, and exchange messages. This feature facilitates the resolution of doubts, queries, and instructions related to tasks, ensuring clear communication at any time. To initiate a chat with stakeholders associated with a task, click the chat icon in the second column of the corresponding row.
Access the 'Master Schedule'/ 'Contractor Schedule' Interface
- Ensure that you are in the schedule module of the project. If not,
- Open the management console for the project
- Click the main menu at the top-left
- Click 'Schedule' under 'Scheduler' menu
The scheduler opens in the grid view by default.
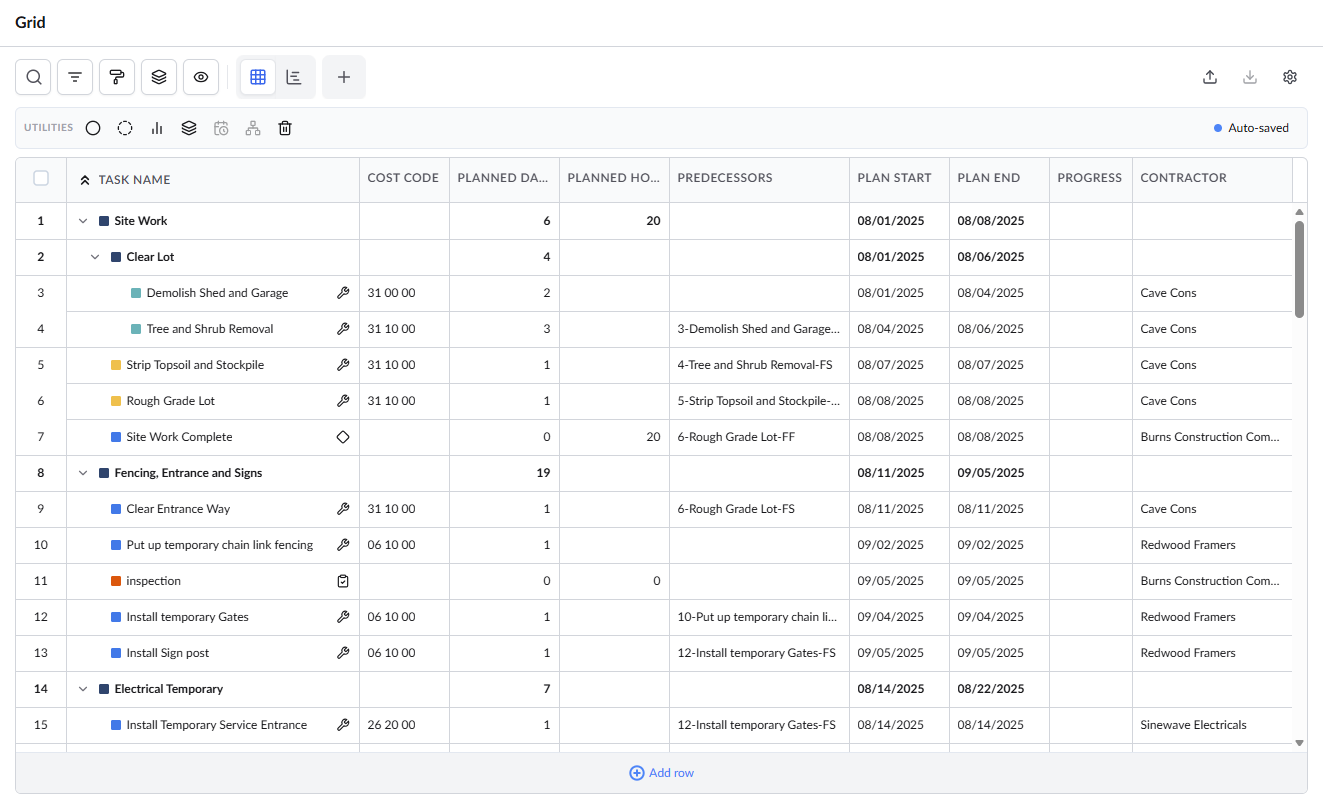
The table allows you to add new rows and add/edit the schedule items and their details.
- Click 'Add Row' at the bottom to add a blank row at the bottom of the table to add new entries
The utility
 | - | Highlight the critical path while strictly maintaining all original task dependencies, even if some work has been performed out of sequence. See Retained Logic- View Critical Path for more details. |
 | - | Highlight the critical path by allowing actual progress to override original dependencies, revealing the updated path based on work already executed. See Progress Override Logic - View Critical Path for more details. |
 | - | Create status line markers on Gantt chart to track task progress and updated schedules at any point in the project lifecycle for effective comparison. Create Schedule Status Line for more details. |
 | - | Capture snapshots of your project schedule at any point in time and create successive baseline versions. See Create a Baseline Version for more details. |
 | - | Adjust project schedule to update the planned start and finish dates for all on-going tasks based on actual progress and current logic. See Reschedule - Overview for more details. |
 | - | Indicates that a reschedule is actively in progress for General or Standalone Contractors, or is currently under review for Subcontractors. Click to open the 'Reschedule' screen |
 | - | Applies only when the WBS tree is linked with the schedule items on the grid view. Click the icon to view the tasks in WBS tree structure. |
 | - | Applies only when the WBS tree is linked with the schedule items on the grid view. Click the icon to set WBS color for each level. |
The options on the top allow you to clone the entries and edit them as required, delete the schedule, format the text and rows, change the views, filter the entries, import/export the schedule, and more. The following list shows all available options:
 | - | Cut or copy a line item and paste the same in a different position. See Clone Rows and WBS branches for more details. |
 | - | Delete the schedule entirely if you want to create a new one. Please note that you can delete only the schedule in draft state, and cannot delete even if at least one item is assigned to a contractor and published. |
 | - | Clone a branch of the WBS hierarchy and edit it as required. This is useful if you have similar sets of tasks for different locations or levels of the structure being constructed. See Clone Rows and WBS branches for more details. |
 | - | Import the master schedule from the one you created using popular software like Primavera P6, Microsoft Project, or Microsoft Excel. See Import Master Schedule to learn more. |
 | - | Export the schedule and save it as a local file. This is useful if save the current schedule as a template or use this schedule on a similar project with minor adjustments. See Export schedule for more details. |
 | - | Generate a professional PDF snapshot of your project schedule at any stage of execution. See for Export and Print Schedule Snapshot as PDF more details |
 | - | Create a custom view, edit the column as required and share the view you created with others by setting up the access rights. See Manage Custom Grid Views to learn more. |
The options at the top-left allow you to apply filters, organize the rows as groups, and manage custom grid views. | ||
 | - | Find any entry using any of the values in the table as your search criteria. |
 | - | Set up nested filters or filter sets to filter the entries. See Filter Options to learn more. |
 | - | Apply custom color formatting to cells to visually emphasizing data. See Highlight Cells in List View for more details. |
 | - | Organize the entries as nested groups by applying group filters. See Group and Organize Tasks to learn more. |
 | - | Select the views that you want to pin as tabs at the top of the table. See Manage Custom Grid Views to learn more. |
 | - | Switch the scheduler to Grid view |
 | - | Switch the scheduler to 'Grid+ Gantt' view |
 | - | Create your current grid view as a new Custom view. See Manage Custom Grid Views to learn more. |
See the following sections for more details on creating and managing schedules:
- Create a master schedule
- Create a contractor schedule
- Add WBS elements and task items
- Clone Rows and WBS branches
- Add subtasks
- Add a checkpoint
- Add an inspection event
- Add a milestone
- Add dependencies
- Add Dependencies from Gantt View
- Add planned quantities of work
- Assign subcontractors
- Add a change order
- View task details
- Remove a task
- Publish a task
- Update task progress
- Manage Tasks in Gantt view
Was this article helpful?
That’s Great!
Thank you for your feedback
Sorry! We couldn't be helpful
Thank you for your feedback
Feedback sent
We appreciate your effort and will try to fix the article