Add or Edit WBS elements and task items
- 10 Minutes to read
Add or Edit WBS elements and task items
- 10 Minutes to read
Article Summary
Share feedback
Thanks for sharing your feedback!
The schedule interface allows you to add WBS elements, including phases, deliverables, tasks, sub-tasks, and activities, in a hierarchical structure and schedule them according to their timelines.
- General contractors - The Master Schedule - Add high-level elements like phases, deliverables, etc., in the required hierarchy, specify start/end dates, and assign them to subcontractors. The start days, durations, and end days of the items in the parent levels are auto-calculated. You can also add tasks/subtasks for the items that your company can undertake and assign them to your own company.
- Subcontractors - The Contractor Schedule - Receive the work items assigned to them. Add subtasks, work packages, and activities in the required hierarchy to the tasks assigned to you, and schedule them according to the timeline of the parent tasks.
Configure task items in a schedule
- Navigate to the schedule interface.
- The 'Grid' view opens by default.
- Click 'Grid' on the left to return to the grid view if you are on some other screen in the schedule menu.
The example shown below is the master schedule accessed by the GC. The subcontractors access the contractor schedule interface.
.png)
Filtering options:
The filter drop-downs at the top let you filter the tasks based on the assigned contractor and the status:
- Use the contractor filter to view the tasks assigned to a specific contractor
- Use the status filter to view only the tasks on a specific execution state. The available options are:
 Draft - Task items that have been added but are yet to be published
 Scheduled - Task items that are pulled and added to the field schedule but are yet to be started
 .png) InProgress - Task items that are currently under execution
InProgress - Task items that are currently under execution Completed - Task items that are completed to currently under execution 100%
- Click the 'Reset' button to clear the applied filters
 Draft - Task items that have been added but are yet to be published
 Scheduled -
 .png) InProgress - Task items that are currently under execution
InProgress - Task items that are currently under execution Completed -
 Columns:
The Scheduler shows selected columns by default. You can add or remove columns as required.
Add or remove columns
- Right-click on the table header to open the column selection pane:
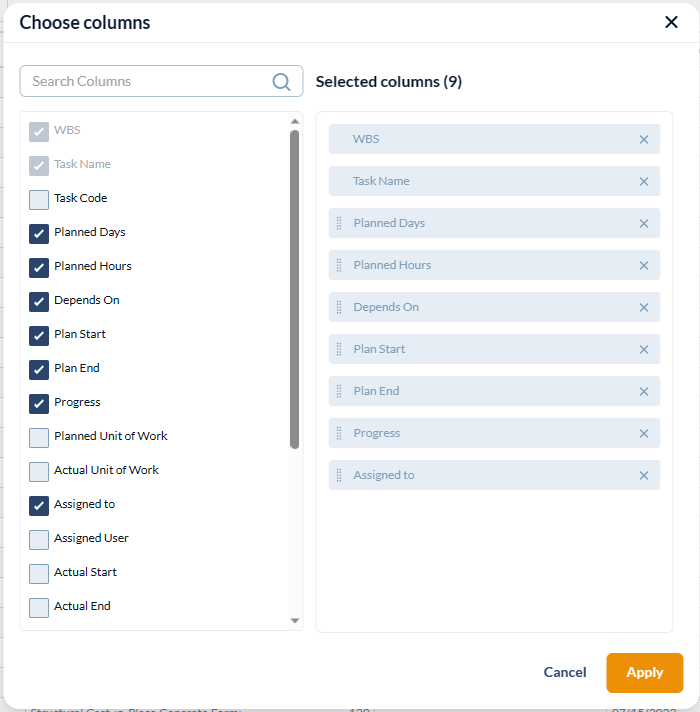
- Select the columns to show and deselect columns to hide.

You cannot remove default columns. Some of the fields are editable, and some are auto-populated. The list of available columns is given below.
WBS - The WBS code number of the task/schedule item
Task Code - The cost code of the item. Auto-populates if the item is added from the estimate along with the color code given at the company admin level. You can also manually enter the code.
Task Name - The label of the task/schedule item
Tip:
The task name gets auto-populated if you enter the task code and not the task name manually.
Duration - The number of days required to complete the task
Hours - The effort hours required to complete the task
Depends On - The dependency of the task item with its predecessor. You can manually set the dependency.
Plan Start - The scheduled commencement date of the task. The planned start date auto-populates for dependent tasks based on the relationship with the predecessor task.
Plan End - The completion date of the task. Auto-calculated from the Plan Start date and the duration
Progress- The current completion percentage of the task.
- Field level tasks - Fetched from the reports from the foreman. The project managers can also manually update the progress.
- Assigned Tasks - The subcontractor shares the tasks' progress with the general contractor.
- Parent-level tasks - Auto-calculated from the progress of the children.
Planned Quantity - The total amount of work done/deliverables planned.
Actual Quantity - The amount of work done/deliverables realized with the current progress state. Fetched from the progress reports of the last-level child tasks.
Assigned To - The contractor company to whom the task item is allotted.
Assigned User - The team member responsible for tracking the task
Actual Start - The real commencement date of the task on the field. Fetched from the actual start date of the first last-tier item of the task branch in the WBS hierarchical tree structure.
Actual End - Auto-populates once the task reaches 100% completion. The real completion date of the task is fetched from the date of the completion of the final last-tier item of the task branch in the WBS hierarchical tree structure.
Predicted End - Autocalculated from the planned start date and the current progress.
The following values are auto-calculated from the task dependencies, their relationships, and the critical path. These apply only to non-critical tasks.
Early Start - The earliest date at which the task can be started.
Early Finish- The earliest date at which the task can be completed.
Late Start- The latest date at which the task can be commenced.
Late Finish- The latest date at which the task can be completed.
Slack- The permissible number of days the task can be started after the planned start date without affecting the overall schedule.
Time to finish - The number of days remaining to complete the task.
- Click 'Apply' for your selection to take effect
Add a row at the end of the list
- Click '+ Add New Row.' Applies only to the GC in an integrated schedule.
Include a row at a specific position inside the list
- Right-click on the item below the position where you want to add a row and choose 'Insert Above' from the options.
Set the hierarchy level of an item
You can use the indent options to move an item to parent level or child level in the WBS structure
- Right-click on the item to be moved to open the context-sensitive menu
- Use the indent buttons to move an item to the required hierarchy level in the parent-child relationship.
 - Move right to make the task as a child to the previous task
 - Move left to move the task to one step higher in the hierarchy level
Note:
You cannot use the indent option to add children to a published task. A published task cannot be edited.
Subcontractors cannot use the indent options on the tasks received from the general contractor. They can only change the hierarchy levels for the items that they add.
Subcontractors cannot use the indent options on the tasks received from the general contractor. They can only change the hierarchy levels for the items that they add.
Add a sub-task
- Right-click on the parent task
- Click 'Add Sub task'
A new row gets added with the WBS code at one level lower than the parent task.
- Enter the details for the subtask as shown below.
- Repeat the process to add task items of successive levels.
- Estimates - Contractors can add tasks, subtasks, and activity items for which the labor and cost (material cost, labor cost, equipment cost, external subcontractor cost, overheads, etc.) are to be tracked from their project estimate. The task code, task name, and man-hours are auto-filled when adding an item from the estimate. You can edit the task name and the manhours for the item. The allotted man-hours are deducted from the total man-hours specified for the item in the estimate. The remaining hours will be available for adding the same task/activity for different parent-level items. See Add tasks from estimates for more details.
Enter the values for each item as shown below:
Note:
The auto-save feature of the scheduler saves the values you enter for each item.
Color code - Assign a color code to the item for easy identification. The bar representing the task in the Gantt charts is shown with the set color.
- Click the color dot at the left in the row of the line item to open the color picker.

There are two ways in which you can specify color code:
1. Color picker
- Drag the slider in the color spectrum bar to select the hue
- Drag the circle in the color field to select the shade
- Drag the slider in the opacity bar to set the color transparency level
- The color coordinates of the chosen color is auto-populated in the text box at the bottom
2. Color coordinates
- Click the arrows at the bottom right repeatedly to switch between HEX, RGBA and HSLA input modes
- Enter the HEX, RGBA or HSLA value of the color you want to assign to the item
Tip:
To assign the same color to a group of items, copy the color cordinate value of the color assigned to the first item and paste the value for the successive items.
- Task code- (Optional) The task code for the item. The task code also doubles as the cost code for tracking the budget and expenses with respect to the item. The codes are specified at your company-level task code roster. By default, Linarc uses CSI MasterFormat codes for the task codes. If your company uses a custom coding structure, enter the code per your company task code roster.
- The task code gets auto-filled on importing the task item from the estimate.
- Task Name - A label to identify the item. Contractors can add custom names for the phases and deliverables they add. If you are adding an item from the estimate, the task name is auto-populated from the estimate. You can edit the name as required. Use the text formatting options at the top right to apply styles to your text.
- Duration - The number of days required for completion of the item. You can enter the duration only for the items at the lowest level in each leg of the hierarchy. The durations for the parent items are auto-computed from those of the child items and auto-filled.
- Hours - The estimated manhours required for completion of the item within the duration. You can enter the manhours only to the items at the lowest level in each leg of the hierarchy. The total manhours for the parent items are auto-computed from those of the child items and auto-filled.
- Dependencies - The tasks to which the current item is connected and their relationship. Some of the tasks can be started/completed only after the commencement/completion of their antecedent tasks. This is important to calculate the critical path of the schedule that identifies high-priority tasks. Execution of these critical tasks on time ensures the timely completion of the project. See Add dependencies for more details on this.
- Start date - The commencement date of the task. You can specify only the start date for the items at the lowest level in each leg of the hierarchy. The start dates of the parent-level tasks are auto-populated from those of the children of each.
- Start dates for dependent tasks are auto-filled once you specify the predecessors and the dependency relationships. You can also change the date as required.
- End Date- Auto-computed from the start date and duration values. You can also set the due date manually by clicking inside the cell and choosing a date from the date picker.
- You can also set the start and end dates for tasks in the Gantt view. Just drag and drop the bar representing an item near the required date range and drag the left and right edges of the bar to particular dates as required. The dates are automatically updated in the list view.
Set dates using the Gantt chart:
You can set start and due dates for last-level child tasks using the Gantt chart too. See 'Set task timelines using the Gantt chart' below for more details.
- Planned Quantity - (Optional) The expected total amount of work done/deliverables from the task item with its unit of measurement. This is useful for tracking the realized yield at any time during the task's life cycle. See Add planned quantities to tasks for more details.
- Progress - Applies only to published tasks. See Update task progress for more details.
- Assigned to - The GC can assign the lowest level items to subcontractors already associated with the project. See Assign Contractorfor more details.
- Subcontractors - The subcontractors should assign the sub-tasks created by them to themselves for pushing to the field.
Set task timelines using the Gantt chart
The Gantt view shows the scheduled items as a Gantt chart comprising the horizontal bars for each task item on their timelines. You can also view the dependencies and progress percentages for each item.
- Use the drop-down at the top left to switch to 'Gantt view' or 'Grid and Gantt' view
- Alternatively, click the 'Gantt' option on the left to view the schedule as a Gantt chart
The Gantt view allows you to set and modify the start and end dates of the items by simple drag and drop actions.
- You can directly modify the dates only for last-level child tasks, that is, the items that do not have any children. The dates for the parent tasks adjust automatically, depending on the change in the child tasks.
- The start and end dates are shifted for the dependent tasks based on changes in the predecessor tasks and their dependency relationship.
- You cannot modify dates for published tasks.

To set or change the start and end dates for a task
- Drag and drop the bar representing a task item to the required start date
- Drag the left and right edges of the bar to particular start and end dates as required
.gif)
The dates are updated in the schedule automatically.
Was this article helpful?