The 'Equipment Cost' interface shows the cost incurred by the deployment of various equipment and heavy machinery for the tasks. For each task, the expenses are calculated based on the equipment schedule, equipment deployment, and per day running cost of the equipment for each task. The system decrements the expense incurred every day from the total equipment cost estimate and shows the remaining amount for each task as per your overall project estimate. This helps you monitor the variance of the actual expenses from the estimated cost and plan the future costs to complete the tasks within the budget. The details are used for various statistics and key performance indicators, displayed on the dashboards and various reports.
The 'Equipment Cost' Interface
- Ensure that you are in the Costs screen, if it is not already opened:
- Click the app launcher
 and select 'Finance.'
 - Click 'Cost' on the top and 'Equipment' on the left
- Click the app launcher
The equipment cost interface shows a chronological list of expenses incurred by the usage of equipment for various tasks.
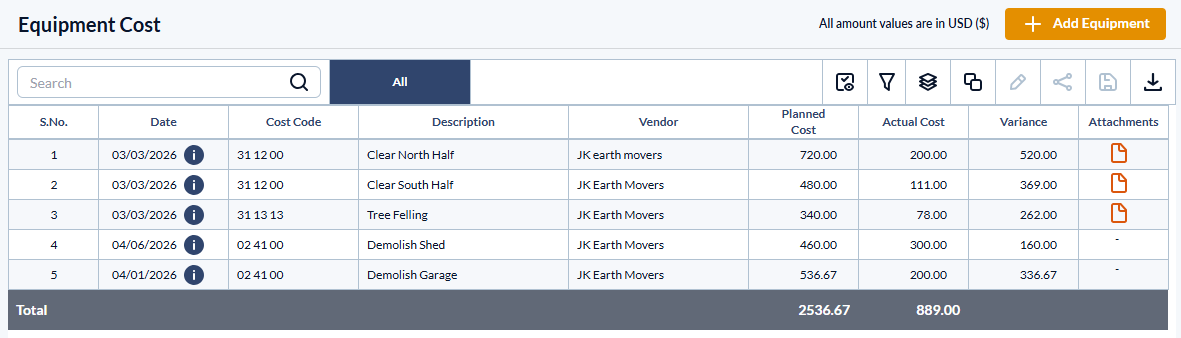
- Date - The date of the payment.
- Cost Code - The cost code assigned to the task item for which the payment was made.
- Task Name - The label of the task as in the contractor schedule.
- Division Code - The code assigned to the division under which the work falls.
- Division Name - The name of the division or section related to the work.
- Vendor - The supplier, seller, or vendor to whom the payment was made.
- Planned($) - The total estimated material cost for the task item.
- Actual($) - The amount of money paid to the vendor in that instance.
- Variance - The amount remaining under the head 'Equipment' in the estimate of that task.
- Click the
 icon near the invoice date to see the description and details for that entry.
Search, filter, and sorting options
- Use the 'Search' box located at the top left to find a template using any value from the table as search criteria
- Right-click the column header and customize the display and order of the columns as you wish
- The options at the top right allow you to filter the entries, create nested groups of entries, and manage personalized and customized views of the table. Use the links below to learn more about these:
- Hover over a column header and click the
 icon to sort the rows in ascending or descending order of entries in that column
View Groups and Subtotals
- You can get totals and subtotals of numerical data for any selected set of records by grouping and applying nested grouping. Use the
 icon at the top right to organize the data by column headers
 - The system automatically aggregates relevant numerical values, giving a structured breakdown and a clear view of the grand total distribution. See Group and Organize Items in a List View for more details
Download as Excel Sheet
- Click the
 button at the top right to save a local copy of the list in Excel format for sharing and record-keeping. See Download List Views and Logs in Excel Format for more details
Add an Equipment Cost Entry
- Navigate to the 'Equipment' cost interface
- Click '+ Add Equipment' on the top right
The 'Add Equipment' interface shows the list of tasks and subtasks and their estimates.
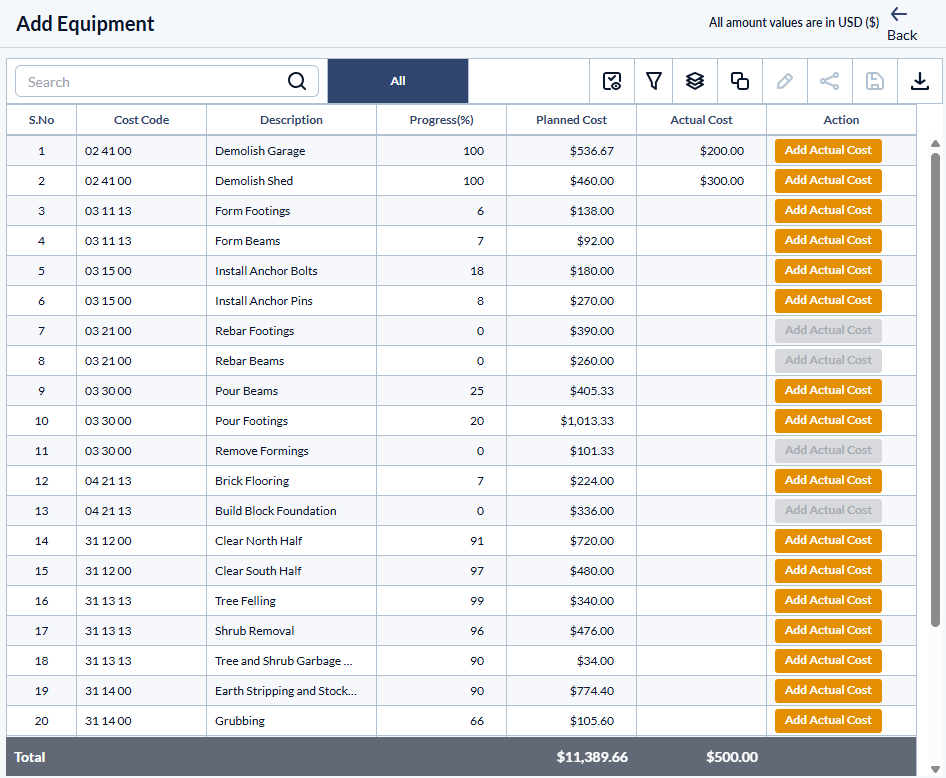
- Cost Code - The cost code of the task item.
- Description - The label of the task, as in the schedule.
- Progress - The completion status of the task
- Planned cost - The total estimated equipment cost for the task item
- Actual Cost - The total amount of money paid so far for the equipment used for the task/deliverable
- Click the
 button in the row of the task to add a payment made for the equipment
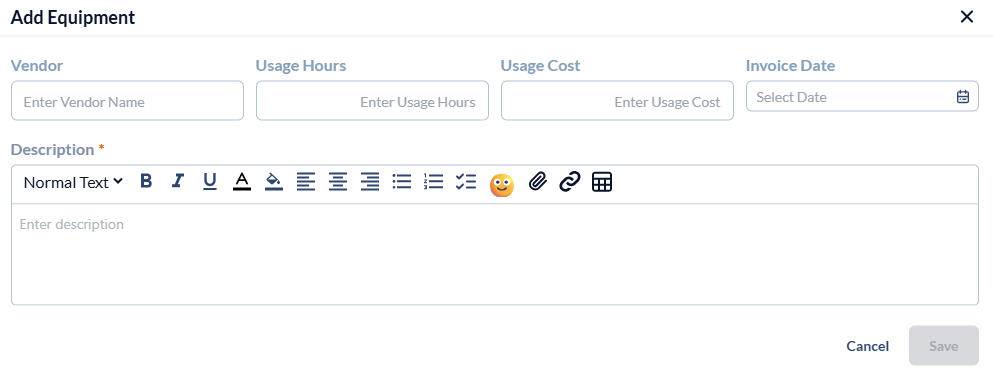
- Enter the details of the payment made:
- Vendor - The name of the vendor organization to which the payment was made.
- Usage Hours- The number of hours the equipment was used on the site
- Usage Cost - The amount of money paid.
- Invoice Date - Use the calendar to enter the date on which the payment was made.
- Description - The details of the equipment used. Use the options at the top to format your text. Add attachments if any.
- Click 'Done'
The 'Total Cost' value for the task item is updated to add the entered amount.
- Click 'Back' at the top right to return to the 'Equipment Cost' interface.
The payment entry is added to the chronological list. Repeat the process to add material costs for more tasks.
Was this article helpful?
That’s Great!
Thank you for your feedback
Sorry! We couldn't be helpful
Thank you for your feedback
Feedback sent
We appreciate your effort and will try to fix the article