The plans module allows you to edit the markups that you created at any time. This is useful if you want to alter the markup elements, resize or relocate them, edit the text notes, etc., as required, even after you have published your markups. Linarc lets you perform the following edits to an already existing markup.
Edit Existing Elements– Update details in your markup when plans change, or corrections are needed
Add New Elements – Include new annotations, shapes, or measurements as work progresses
Remove a Markup Element– Clean up outdated or incorrect markups to keep your plan sheets accurate
Clone and Re-use Existing Elements –Duplicate commonly used annotations to maintain consistency and save time when marking similar elements
Create a Consolidated Markup – Combine multiple markups into a single layer for a unified view, making it easier to review, edit, or share all related information
Note: You can only view the markups created by other stakeholders and shared with you and cannot edit them.
This article explains how users can edit existing elements in the markup. Use the links below to navigate to the sections you need help with:
- Shape tools - Square/rectangle, circle/ellipse, triangle, polygonal, and cloud
- Arrow/line
- Text
- Highlighter
- Freehand markup
- Ruler
- Photo/Image
To edit a markup
- Open the plan sheet
- Open the markups you want to edit from the 'Load Markup' drop-down. See View Markup for more guidance.
The selected markups are displayed together on the same sheet, with their names displayed as groups in the left hand side layer editor with individual layers listed under each group.
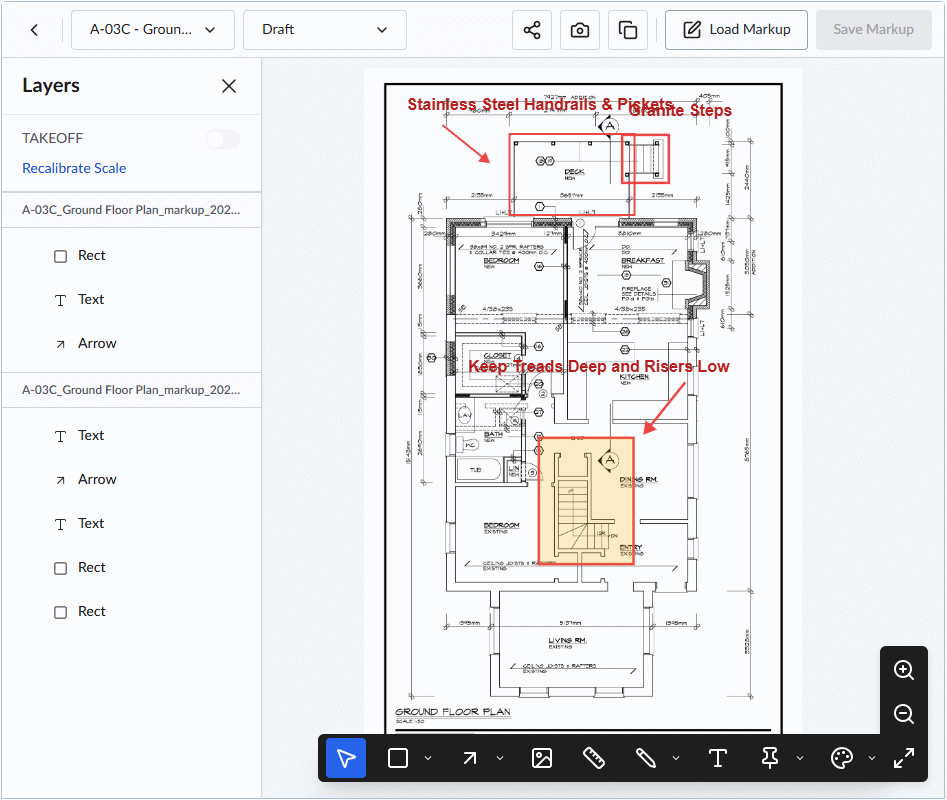
- Directly click on the element you want to edit
- Alternatively, click the label on the layer editor to select the element
Shape tools - Square/rectangle, circle/ellipse, triangle, polygonal, and cloud
- Use the handles at the corners to resize the shape
- Select and drag the element to relocate it
- Use the color palatte to change the appearance
See Mark areas and Mark an Area with Polygonal Shape to learn more.
Arrow/line
- Use the handles at the ends to resize and relocate the arrow/line
- Use the color palatte to change the appearance
See Add Lines and Arrows to learn more
Text
- Drag the text markup to relocate the text
- Click on the markup directly or the pencil icon in the top editor pane and edit the text
- Use the color palatte to change the appearance
See Insert Text Notes to learn more
Freehand markup
- Use the handles at the corners to resize the shape
- Select and drag the element to relocate it
- Use the color palatte to change the appearance
See Create a free-form/freehand markup to learn more
Photo/Image
You cannot edit or remove the existing images but can attach new images.
See Attach photos to markups to learn more
- Click 'Save Markup' at the top-right for your changes and additions to take effect.
To remove a markup element layer
- Click the
 icon next to the label of the layer in the layer editor
 - Alternatively,
- Select the element and click the trashcan icon in the tool pane above the markup
- Use the delete key on your keyboard to remove the element.
- Save your changes once done
Was this article helpful?
That’s Great!
Thank you for your feedback
Sorry! We couldn't be helpful
Thank you for your feedback
Feedback sent
We appreciate your effort and will try to fix the article