Important Note: This feature is available only for projects configured for Schedule-Progress Based billing as permitted by the client contract. General Contractors and Stand-Alone Contractors establish this setting during initial contract setup, while Subcontractors select their preferred billing method within their Linarc billing configuration.
The billing module continuously monitors task updates to maintain a dynamic list of billable work. By combining real-time progress data with your budget allocations, Linarc calculates critical financial metrics to ensure precision in your billing cycle.
If enabled in your billing setup, you can progressively draft multiple Pay Apps throughout the month as milestones are met. The system batches these drafts for a single submission on your billing day, and even allows you to include standalone Pay Apps to claim released retainage
How Billable Items Populate by Contractor Type
The exact items that appear as eligible for billing depend on your role in the oproject:
- General Contractors: Your eligible list includes your self-performed work items, as well as the tasks assigned to your Subcontractors (based on their actual completion percentages). You will compile these combined items and submit your Pay App to the project owner.
- Subcontractors: Your eligible list is populated specifically with the tasks assigned to your commitment contract by the GC. You will submit your Pay Apps directly to the GC.
- Stand-alone Contractors: Your eligible list includes all scheduled tasks within your Work Breakdown Structure (WBS). You will submit your Pay Apps directly to your client (either a GC or the project owner).
Manage Your Claims
From the 'My Progress' screen, you can easily manage your claims:
- Review Eligible Work: The screen displays all items eligible for the current billing, complete with up-to-date progress and cost details.
- Select Items: Choose specific items to include in your current Payment Application (Pay App). If your configuration settings allow it, you can progressively build multiple Pay App drafts throughout the month and submit them as a single batch on your designated submission day.
- Reconcile Percentages: Once items are added to a Pay App, you can manually adjust their progress percentages to reflect the exact amount you wish to bill. You can also include unstarted tasks with a custom billing percentage to claim upfront deposits or mobilization costs.
- Submit and Invoice: After submission, your designated payor (the GC or the project owner) will review your Pay App for approval or revision. Once officially approved, you can seamlessly generate an invoice and submit it for payment.
Use the links below to jump to the section you need help with:
View the Available Work Items for the Current Cycle
Ensure you are on the 'My Progress' screen within the Finance module. If you need to navigate there, follow these steps:
- Click the Main Menu icon at the top-left of your screen.
- Under the Finance & Controls section of the drop-down menu, select the appropriate billing type depending on your role:
- General Contractors: Select 'Owner Billing'.
- Subcontractors & Stand-alone Contractors: Select 'Monthly Billing'.
- Select 'My Progress' from the left-hand menu.
Tip: Press and hold the Cmd (Mac) or Ctrl (Windows) key on your keyboard while clicking any menu item to open the module in a new browser tab.
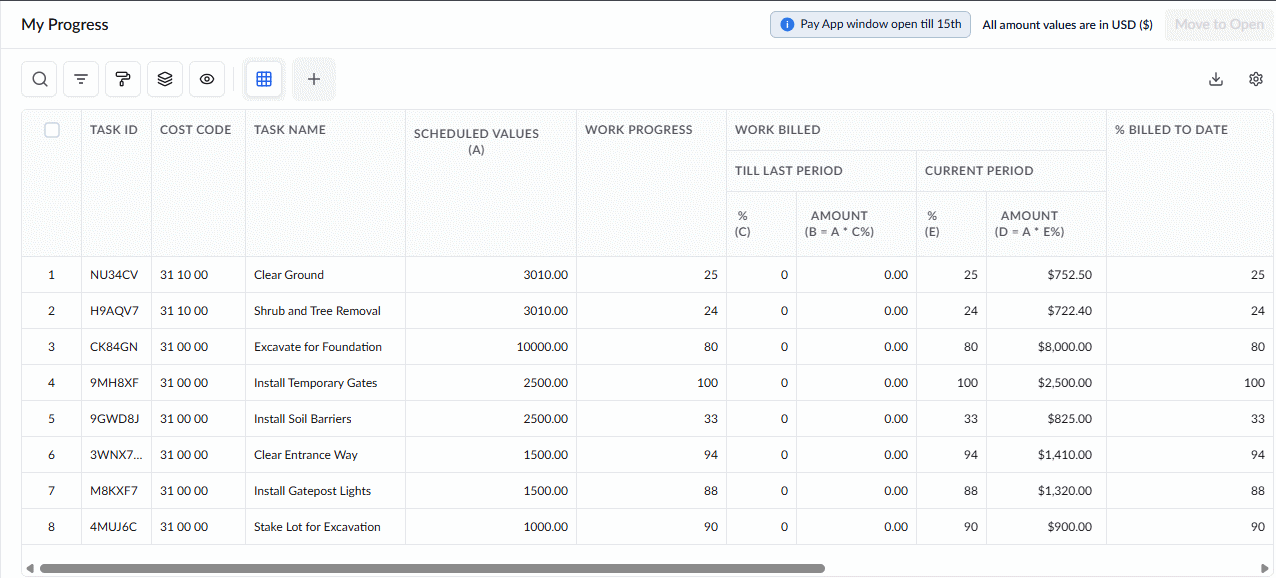
The table displays a detailed list of all work items currently eligible for billing, with your next Pay App submission date highlighted at the top. You can create multiple progressive Pay Apps throughout the month leading up to this date, and then submit them all together as a single batch on or after your designated submission day.
- Task ID - The system-generated alphanumeric code for the task used internally by various modules in the platform.
- Cost Code - The cost code for the task item, derived from the contract line item, from which funds are allocated to the work item.
- Task Name - The label of the task item as in the contractor's schedule.
- Scheduled Values (A) - The total amount allocated to the work item, from the contract cost breakdown, that is, the planned overall cost of the item.
- Work Progress - The total completion percentage of the task
- Work Billed:
- Till Last Period % (C) - The cumulative completion percentage of the work billed till the previous pay app.
- Till Last Period Amount (B=AxC%) - The cumulative amount billed till the last pay app.
- Current Period% (E) - The progress percentage achieved specifically during the current billing month. You can manually adjust this value to reflect the exact percentage you wish to bill in your upcoming Pay App. This flexibility is especially useful if you need to claim upfront funds for expected expenses, such as material procurement or mobilization.
- Current Period Amount (D = AxE%) - The gross billable amount for the current billing period, calculated based on the current period progress percentage.
- Till Last Period % (C) - The cumulative completion percentage of the work billed till the previous pay app.
- %Bill to Date (M=C+E) - The total cumulative progress of the task as of the current billing date (calculated by combining your previously billed percentage with your current period percentage)
- Current Retainage (R) - The amount retained from the gross billable amount for the current billing as per the contract terms.
- Net SOV (N = D-R) - The amount billable for the current billing period, excluding the retainage,
- Bill to Date (G = B+D) - The cumulative gross total billable amount incurred for the task up to the current billing date, including retainage.
- Last Retainage - The total value of the amounts withheld from previous billing cycles.
- Balance to Finish (F=A-G) - The remaining billable amount in the task's total planned cost, after the current billing cycle.
Search, Filter, and Sorting Options
- Click the magnifier icon and use the 'Search' box located at the top left to find an entry using any value from the table as search criteria
- Click any column header to sort the rows in ascending or descending order based on that column's data.
- Click the cog wheel icon at the top right to adjust the display density and customize the display and order of the columns
- The options at the top left allow you to filter the entries, create nested groups of entries, highlight cells and manage personalized and customized views of the table. Use the links below to learn more:
Move the Work Items for Pay App Generation
- Select the items for this month’s billing by clicking their serial numbers
- Click 'Move to Open' at the top-right
Note: Work items under the same parent are auto-selected as a block for the current cycle and cannot be partially chosen.
The selected line items will be moved to 'Progress Billing' > 'Open' screen. You can reconcile the items, add more details and submit the same for pay app generation.
You can also revert the items from the 'Open' screen to reserve them for next cycle billing.
See Create Payment Application for more guidance.
Was this article helpful?
That’s Great!
Thank you for your feedback
Sorry! We couldn't be helpful
Thank you for your feedback
Feedback sent
We appreciate your effort and will try to fix the article