Important Note: Creating payment applications using this workflow applies only to projects where the billing method is set to Schedule-Progress Based, as dictated by the client contract. General Contractors and Stand-Alone Contractors establish this setting during initial contract setup, while Subcontractors select their preferred billing method within their Linarc billing configuration.
The 'My Progress' screen dynamically tracks your billable work, updating in real time as you log task progress. When it is time to build a Payment Application (Pay App), you can easily choose which available items to include in your current bill. Linarc automatically calculates the claimable percentage for each item, but you retain full control to edit this number. You can decrease the percentage to reserve funds for a future billing cycle, or increase it to secure upfront capital for things like mobilization and material purchases.
Available Billing Items by Contractor Type
When creating your Payment Application (Pay App), the specific work items available for billing will automatically populate based on your workspace type:
- General Contractors: Your eligible list includes both your self-performed work and the tasks assigned to your Subcontractors (reflecting their actual completion percentages). You will compile these combined items to submit a master Pay App to the project owner.
- Subcontractors: Your eligible list is populated exclusively with the tasks assigned to your commitment contract by the General Contractor. You will submit your Pay App directly to the GC for approval.
- Stand-Alone Contractors: Your eligible list includes all scheduled tasks within your Work Breakdown Structure (WBS). You will submit your Pay App directly to your client (whether that is a GC or the project owner).
Once your selections are made, Linarc streamlines your next steps:
- Selected items move to the 'Open' screen, which provides a detailed breakdown of your chosen tasks, their progress, and their monetary values for easy review and reconciliation.
- Unselected items stay right where they are on the 'My Progress' screen so they are ready for future billing cycles.
Note on Progressive Billing: If enabled in your project settings, you have the flexibility to draft multiple Pay Apps progressively throughout the month. As work is completed, you can build applications in successive terms and accumulate them to submit as one convenient batch on or after your designated pay app submission date.
Stored Materials
Record and claim the monetary value of uninstalled materials stored on-site or in an off-site warehouse. How stored materials affect your monthly pay applications depends on the contract and billing configuration:
- Consumption-Based: Material costs are billable only as they are installed, calculated in proportion to task completion percentages. Under this method, materials stored for future use cannot be billed. Any values entered in the Stored Materials field are tracked for informational and inventory purposes only and are excluded from the current billing total.
- Stored Material-Based: Enables you to claim the amounts spent on procuring materials stored on-site or in a warehouse prior to installation, irrespective of task progress. To include these costs in your current pay application, enter the dollar value of your stored inventory in the Stored Materials column on the Pay App generation screen.
Creating a pay app involves the following steps:
- Step 1 - Select and Stage Items for the Current Pay App
- Step 2 - Review and Reconcile Staged Values
- Step 3 - Generate the Pay App
Step 1 - Select and Stage Items for the Current Pay App
Ensure you are on the 'My Progress' screen within the Finance module. If you need to navigate there, follow these steps:
- Click the Main Menu icon at the top-left of your screen.
- Under the 'Finance & Controls' section of the drop-down menu, select the appropriate billing type:
- General Contractors: Select 'Owner Billing.'
- Subcontractors & Stand-alone Contractors: Select 'Monthly Billing.'
- Select 'My Progress' from the left-hand menu.
Tip: Press and hold the Cmd (Mac) or Ctrl (Windows) key on your keyboard while clicking any menu item to open the module in a new browser tab.
The example below displays the 'My Progress' screen from a General Contractor's workspace. The interface will look very similar for Subcontractors and Stand-alone Contractors, displaying all tasks that are currently eligible for Pay App generation.
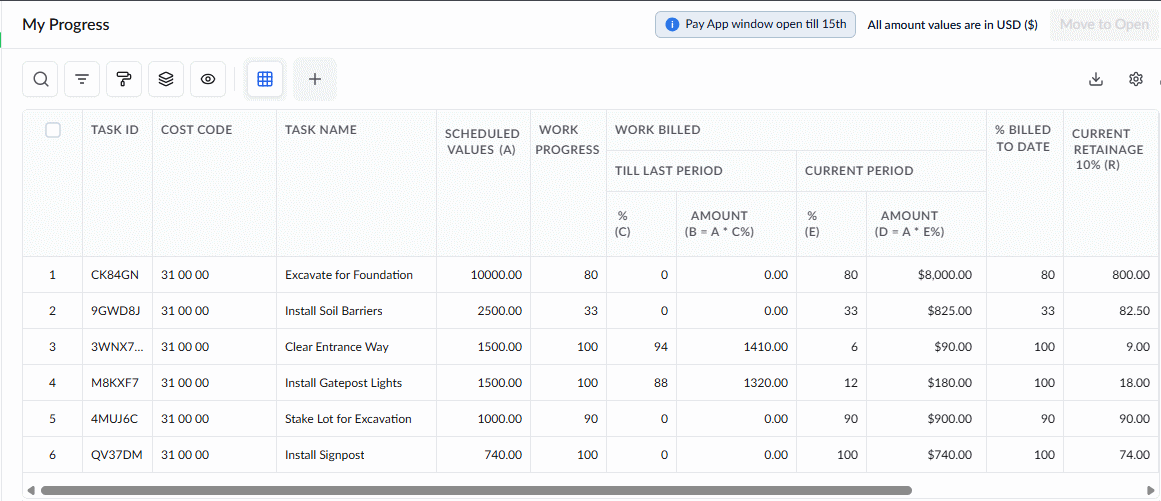
The table displays a detailed list of all work items currently eligible for billing, with your next Pay App submission date highlighted at the top. You can create multiple progressive Pay Apps throughout the month leading up to this date, and then submit them all together as a single batch on or after your designated submission day, if allowed in your billing configuration.
Adjust Task Billing Percentages (Optional)
Most values in this table are read-only to ensure data integrity. The only editable field is the work percentage located under the 'Current Period' column.
- For applicable items, click into the cell and type in the specific percentage of work you want to claim on your current bill.
The monetary cost value will update automatically based on the percentage you enter.
Important Note: If you enter 100% for a task item's current period, it marks the item as fully billed. That specific task will no longer appear as an available item in future billing cycles.
Move items to the billing process
Once your percentages are set, you are ready to stage your items for submission:
- Select the items you want to submit by clicking their corresponding serial numbers on the left side of the table.
- Click the Move to Open button at the top right of the screen.
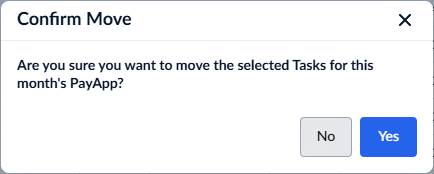
Click Yes in the confirmation dialog.
Note: Selecting any child task item automatically selects all of its sibling tasks. This means all tasks under the same parent task will be auto-selected to maintain billing consistency.
The selected items are now staged in the 'Open' state, and you will be automatically redirected to the 'Open' screen. From here, you can review your items and instantly generate your Pay App. Alternatively, you can choose to leave these items staged and submit them at a later time by navigating to 'Billing' > 'Open'.
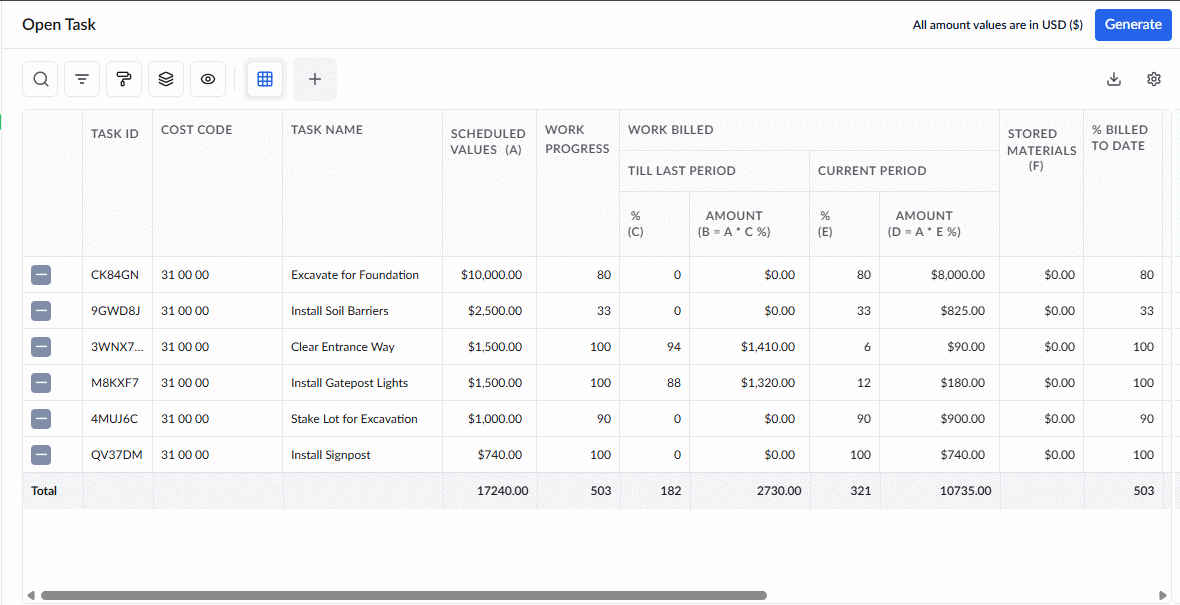
The 'Open' table displays all work items submitted and eligible for invoicing, along with a detailed breakdown of their cost values. Its columns mirror those in the 'My Progress' table, with additional fields providing further details:
- S No.- The serial number of the item, shown after the Pay App is generated. Till then, it shows the control
 icon to revert the item from the open items list to the 'My Progress' list, if you want to reserve the item for next month's bill.
 - Stored Materials - The monetary value of the materials remaining unconsumed or in stock, related to the work item. You need to manually enter the value. See Add Stored Materials Cost below to learn more.
- Links - Click to link related project documentation items like RFIs, Submittals, Plans sheets with or without markups, scheduled tasks etc., to the work item
- Attachments - Click to attach any images or documents related to the work item, and view previously attached items.
Step 2 - Review and Reconcile Staged Values
- Ensure you are in the 'Billing' > 'Open' screen.
Before finalizing your Pay App, you have the flexibility to adjust your staged items right from this screen:
Remove Items
If you decide to postpone billing for specific items—even if work was performed during the current cycle—you can easily remove them from staging. This sends the items back to the progress stage, making them available for future billing with the updated completion percentages, as applicable.
To remove an item from the staging/'Open' list
- Click the
 icon in its row.
The item is removed from your current queue and returned to the 'My Progress' screen so you can include it in a future bill.
Add Stored Materials Cost
Enter the monetary value of uninstalled materials stored on-site or in an off-site warehouse. How this value affects your payment application depends on your configured billing rule:
- Consumption-Based: Enter stored material values for inventory tracking only. Because costs under this method are billed strictly as materials are installed, any amount entered here remains informational and is automatically excluded from your billable total.
- Stored Material-Based: Enter the current dollar value of your stored inventory directly into the 'Stored Materials' column to include these costs in your current month's payment application. This allows you to claim the amount spent on procuring materials before they are installed, irrespective of task progress.
- Click within the 'Stored Materials' column for the specific item to input the cost of unused materials.
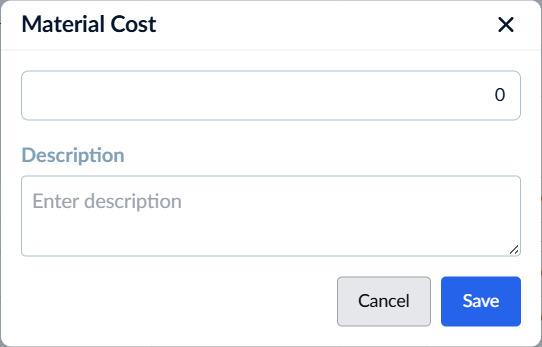
- Enter the monetary value of the materials currently in stock.
- Enter your notes or comments about the remaining materials in the 'Description' field
- Click 'Save'
- Repeat the process for all applicable task items.
Step 3 - Generate the Pay App
Once you have finalized the list of items for the current billing period in the staging screen, you can compose it as a Pay App.
You have two options:
- Instantly submit it as a PDF to the paying party - Applies to those created on or after the monthly submission threshold date
- Save it for submission to the paying party after the monthly submission threshold date
Pay App Prerequisites:
- Signature Setup – Your Pay App is generated with your digital signature, which is automatically fetched from your profile. You must have this set up beforehand. If you haven't done so yet, Linarc will prompt you to register it when you create the Pay App. See Register Your Signature for detailed steps.
- Template Configuration – Pay Apps are generated using a template defined at the portfolio level. Linarc provides a default preset, but you can also create custom templates—either from scratch or by cloning a predefined one—to align with your company’s branding. See PDF Templates – Overview for details.
To compile the pay app
- Click 'Generate' a the top-right
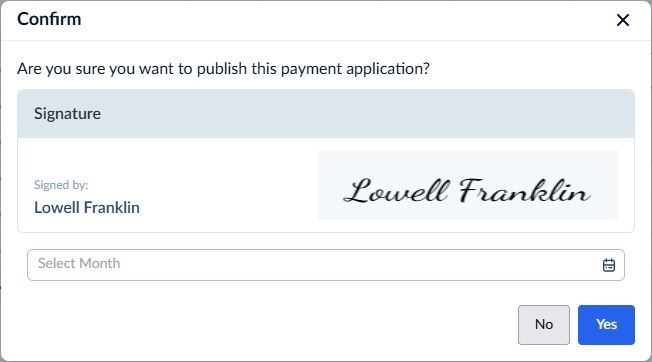
- Confirm your signature. The signature is fetched from your profile settings. If you haven't added your signature to your profile, you will be prompted to do so.
- Enter the month for which the payment application is generated.
- Click 'Yes' to continue
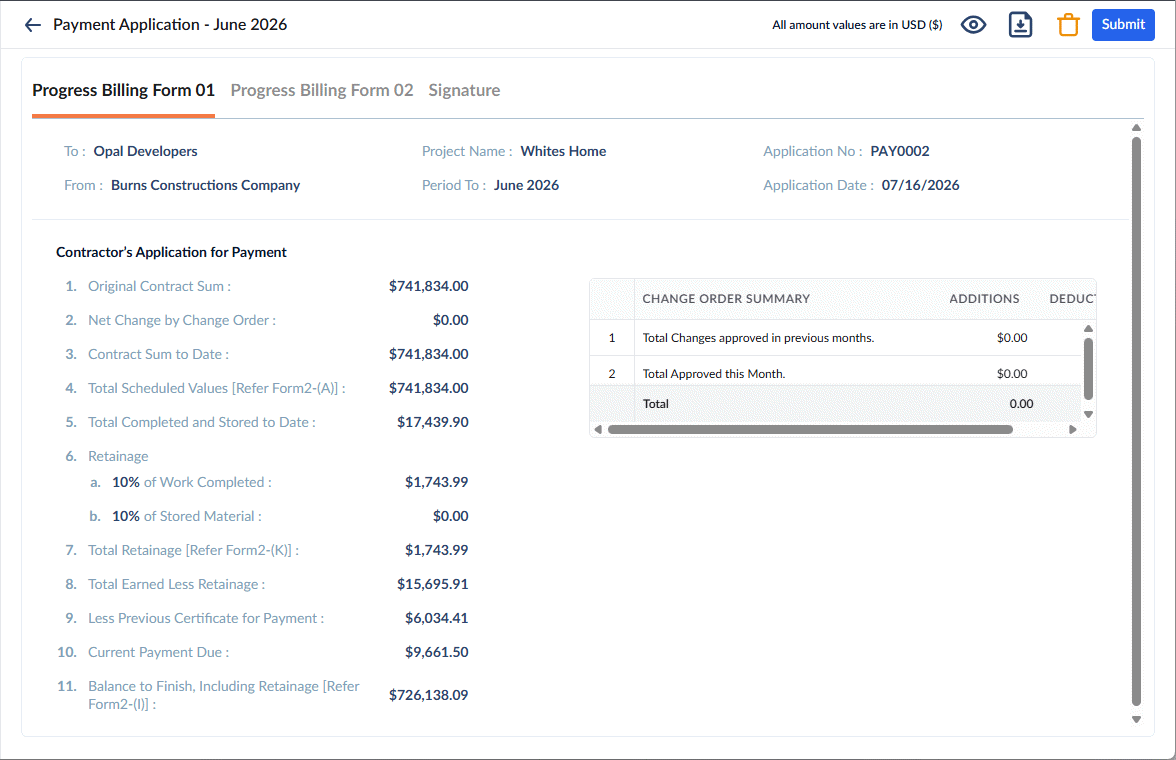
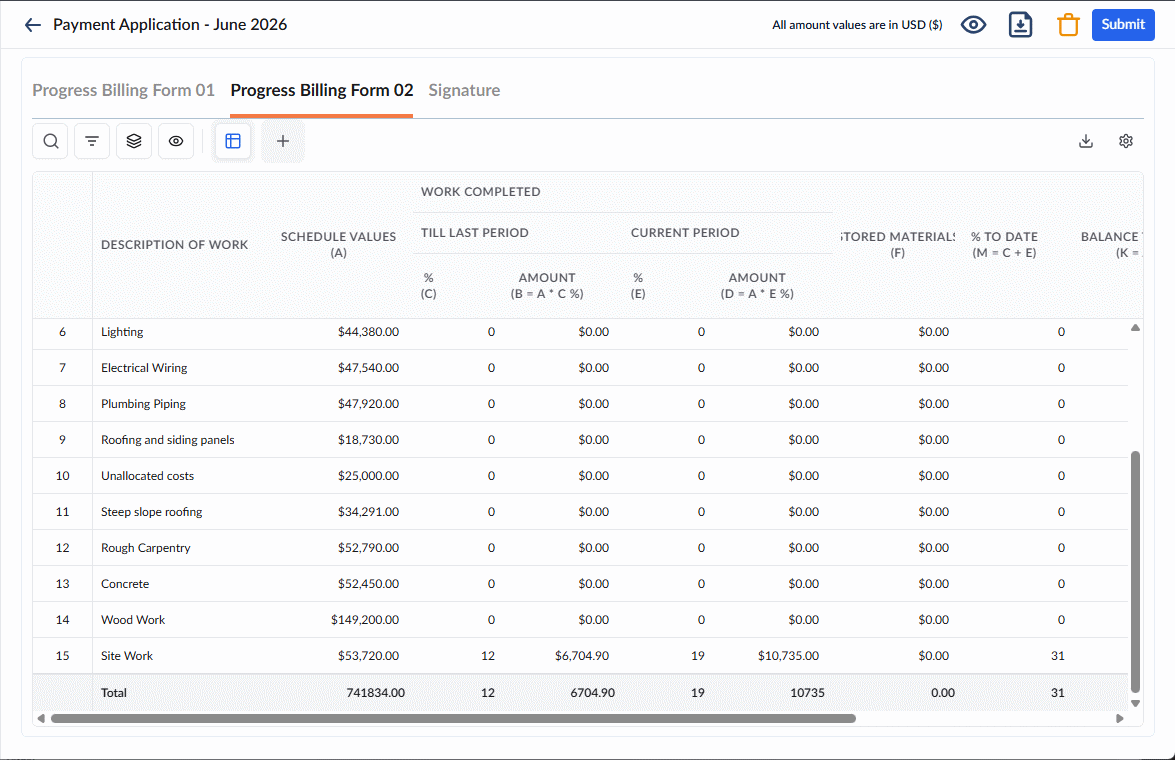
- Review the details and check the Forms:
- Form 1 Tab shows the Summary of the payapp with the layout as per industry standards
- Form 2 tab shows the details of amounts billed against each SOV line item
- Click the
 icon to view the PDF version of the pay app.
 - Click the
 button on the top right to download the PDF version of the pay app
You can view the list of pay apps generated in the 'Progress Billing' > 'Pay Apps' screen.
Next Steps:
1. If generated on or after the submission date:
- Click 'Submit' to instantly forward the pay app to your client. How your Pay App is routed depends on your contractor type:
- General Contractors: The Pay App routes directly to the Owner if they are in the project directory. If they are not in the directory, you must forward the PDF to the Owner externally. Once you receive their out-of-band approval, manually mark the Pay App as 'Approved' in Linarc, and proceed to invoice generation.
- Subcontractors: The Pay App automatically routes to the General Contractor within Linarc. Once the GC approves it, you can proceed to invoice generation.
- Stand-alone Contractors: Linarc automatically emails the PDF version to the client listed in your billing configuration. Once the client approves it, you can proceed to invoice generation.
2. If generated before the submission date:
The Pay App will simply be added to your pending list. You can accumulate multiple progressive Pay Apps throughout the month and submit them all together as a single batch once your official submission date arrives. See Submit Payment Applications for guidance.
Was this article helpful?
That’s Great!
Thank you for your feedback
Sorry! We couldn't be helpful
Thank you for your feedback
Feedback sent
We appreciate your effort and will try to fix the article