The Project Manager can actively refine and adjust the Look Ahead schedule upon creation to ensure it accurately reflects the reality of the project. To build a realistic and actionable short-term plan, you can perform the following key actions within the draft:
Open the Draft Look Ahead
- Ensure that you are on the 'Schedule' module of the project. If not:
- Click the main menu at the top left
- Click 'Schedule' under the 'Scheduler' menu and click 'Look Ahead' on the left
To view other Look Aheads that are in draft status, open the date range drop-down at the top left and select the desired period
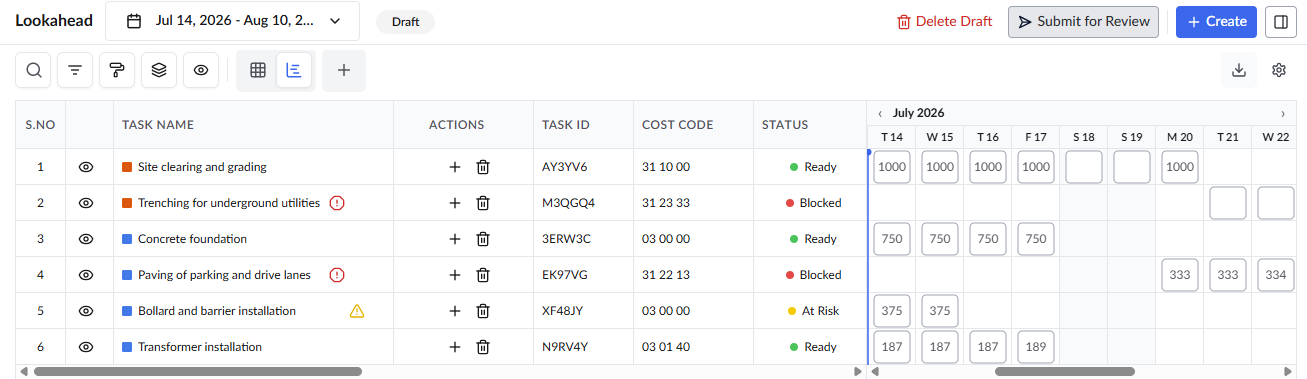
Add Tasks to the Look Ahead
You can add new tasks from the project schedule to the Look Ahead if they should be included in the selected period but are currently scheduled for a different timeline.
- Open the desired draft schedule as mentioned above
- Click the
 to add a task to the current draft Look Ahead
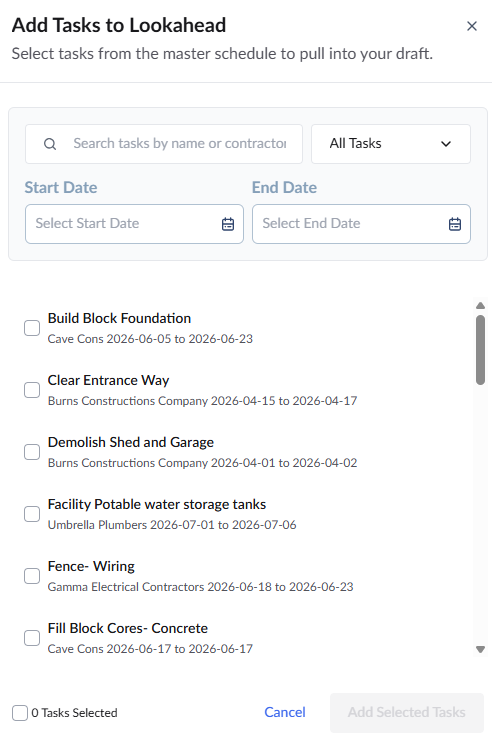
- Use the filters at the top to quickly locate the required tasks. You can:
Search by Task Name or Assigned Contractor: Enter the task name or the assigned contractor in the search bar to find it instantly.
Filter by Status: Click the drop down and select the status
Filter by Date Range: Use the date picker to display tasks scheduled within a specific date range.
Click the 'Task name' to select as many as as you want
Alternatively,
- Click the check box at the bottom left of the pop up to select all the tasks
Note:
- Linarc lets you add tasks that appeared in the previous Look Ahead schedule but haven’t started or are still in progress, even if their timelines fall earlier than the current Look Ahead period.
- This is especially useful for tracking tasks that were released to the field but not completed by their planned end dates.
- Select the tasks and click 'Add Selected Tasks.'
Remove Tasks from the Look Ahead
You can remove tasks from the Look Ahead—whether they were imported from the project schedule or added manually—for various reasons, such as material or resource shortages, feasibility issues, weather conditions, and more.
- Open the desired draft schedule as mentioned above
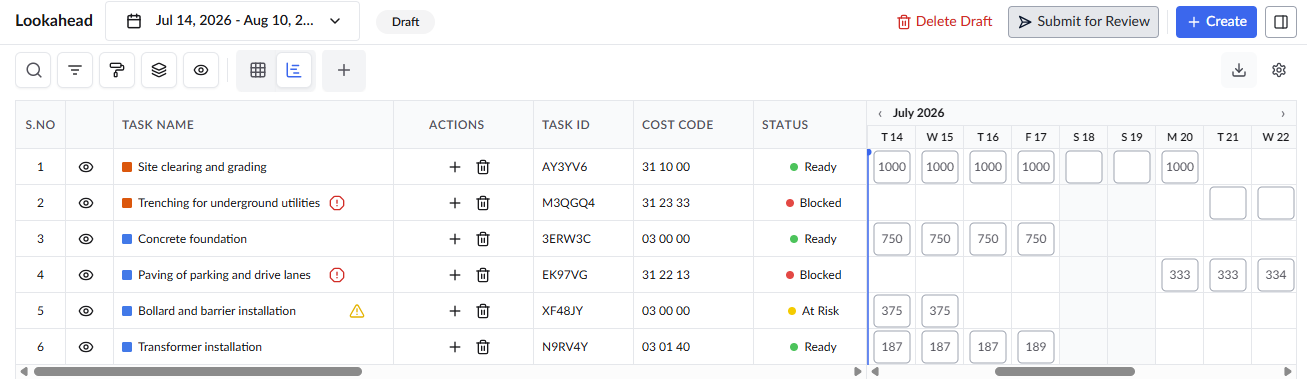
- Click the
 icon to remove the task from the current draft Look Ahead schedule.
Add Planned Quantity for a task
Defining planned quantities establishes clear production targets for your tasks. Setting these targets during the draft phase is essential for accurately tracking daily progress and comparing planned versus actual performance once the schedule goes active.
You can add or edit planned quantities using three different methods:
From the Master Schedule Planned quantities are often established during the initial project planning phase. If quantities were already defined in the Master Schedule, they will automatically carry over to the Draft Look Ahead.
From the Look Ahead Gantt Grid
This method allows for quick, inline data entry directly within the main schedule view.
- Locate the specific task within the Draft Look Ahead schedule grid.
- Scroll horizontally across the table to find the Planned Quantity column.
- Click directly into the cell intersecting with your desired task.
- Enter the target quantity for the task and press Enter (or click outside the cell) to save the value.
From the Task Overview Panel
This method is ideal when you are already reviewing or editing other specific details of a task.
- Click the eye icon next to the task name to open the task details panel on the right side of the screen.
- Ensure the Overview tab is selected at the top of the panel.
- Scroll down to the 'Production' section.
- Locate the Planned Quantity field and enter the total target amount for the task.
- The system will automatically save the entered quantity, updating the task's production metrics.
Was this article helpful?
That’s Great!
Thank you for your feedback
Sorry! We couldn't be helpful
Thank you for your feedback
Feedback sent
We appreciate your effort and will try to fix the article