Your project budget serves as the operational financial blueprint for your awarded contract. Linarc gives you the flexibility to take your total contract value, break it down into planned tasks and deliverables, and granularly distribute funds across specific cost types—such as labor, materials, and equipment.
You can build your budget line-by-line from scratch or seamlessly import it from an Excel spreadsheet.
Managing Your Budget Baseline & Adjustments
- Draft & Lock: Build your draft budget once the contract is locked in the system. After the entire contract amount is fully distributed across budget lines, you can lock the budget and allocate line-item funds directly to project schedule tasks.
- Internal Rebalancing: Even after locking your budget baseline, you can adapt to project changes using the Budget Adjustment feature. Reallocate funds between cost types or transfer surplus amounts between line items, provided the overall contract value remains unchanged.
Pro-Tip — Plan a Reserve Pool:
Because your total contract amount must be fully distributed, dedicate any remaining unassigned funds to a specific line item labeled 'Unallocated' before locking the budget. Keeping these funds unassigned to specific schedule tasks creates a flexible pool to draw from via Budget Adjustments when unexpected site expenses arise.
Budgeting Guidelines & Finalization Rules
- Match Total Contract Value: Your overall budget amount must exactly equal the total awarded contract value.
- Exhaustive Distribution: Ensure the entire contract amount is fully distributed across your budget line items and cost types before finalizing.
- Lock Baseline: Lock your budget once fully distributed and approved to establish your definitive financial baseline.
Best Practice: Complete your billing configuration prior to budget entry. This ensures that essential line-item values, like overhead costs, auto-calculate and populate seamlessly based on your project's billing rules.
How should I set up the budget and schedule for procured or stored materials based on my Billing Configuration?
The correct setup depends entirely on the specific billing terms outlined in your contract:
- If your contract allows billing upon delivery: Create materials as a separate line item in both your budget and schedule. Link them via budget allocation, and mark the schedule line item as 100% complete once the materials arrive on site.
- If your contract requires billing only as materials are consumed/installed: Include materials within the same line item as the associated work and let standard task progress billing handle the claims.
- If your contract allows billing for stored materials prior to installation but only when the associated work has started: Include materials within the same line item as the associated work, but utilize the Stored Materials billing feature to claim stored inventory.
To set up your project budget
Reminder: The Budget module is accessible only after your contract is officially locked in the system.
- Click the main menu icon located at the top-left of your screen.
- Select 'Contract' under the 'Finance & Controls' section in the drop-down menu.
Tip: Press and hold the Cmd (Mac) or Ctrl (Windows) key on your keyboard while clicking to open the module in a new browser tab.
- Select 'Budget' from the left-hand navigation menu to begin your setup.
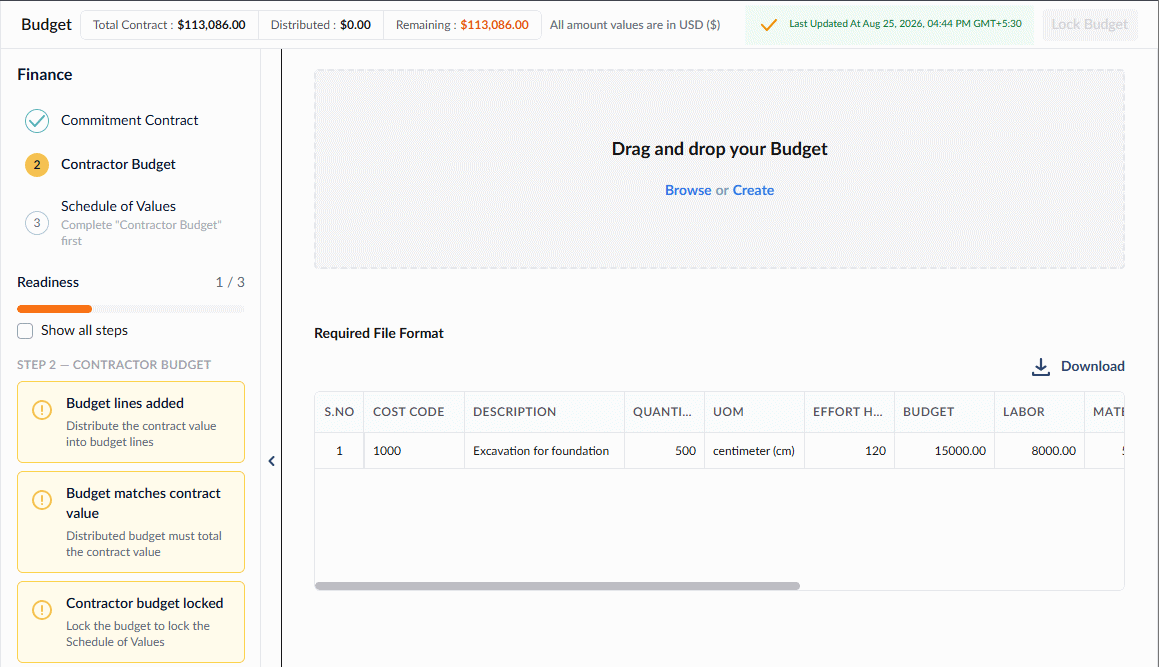
Top Summary Bar: Tracks real-time totals—Total Contract, Distributed, and Remaining (red until $0.00) funds (in USD).
Setup Progress Panel (Left): The collapsible slider features an auto-updating checklist, tracking your setup progress:
- Step 1 - Commitment Contract: Verifies contract value, dates, and contract lock status.
- Step 2 - Budget Setup: Tracks budget line distribution and budget lock status. (Current Step)
- Step 3 - Schedule of Values: Guides SOV creation and finalization.
(Green checkmark = Complete | Yellow alert = Action Required)
Upload & Import Area: Allows you to setup your project budget. You can set the budget in two ways:
Manually Create Budget
1. Click 'Create' on the 'Budget' screen.
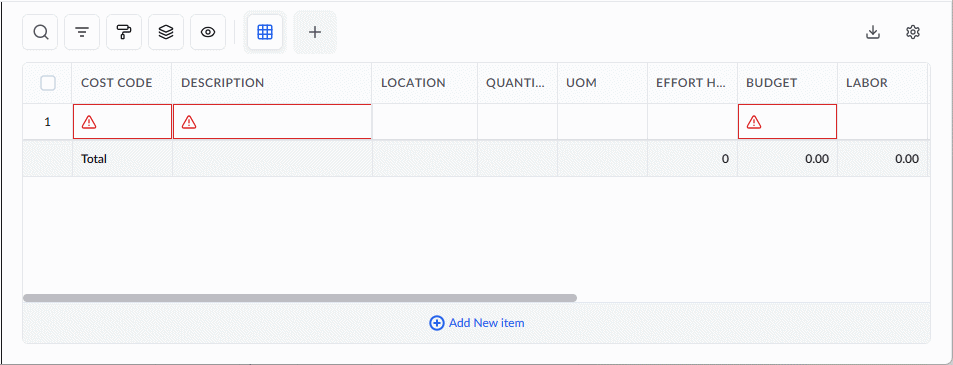
2. Enter the values for each line item using the columns detailed below. (Note: Mandatory fields are highlighted in red.)
General Item Details
- Cost Code: The standard alphanumeric code for the task or deliverable, pulled directly from your company's master list. Click inside the cell to search by code number or item name. Once selected, the description will auto-populate. You can change the description as required.
- Description: The name or label of the budget item. This auto-populates based on the selected cost code, but you can edit it as needed.
- Location: The area, region, or spot in the site where the work item is executed. Click inside the cell and select the location from the hierarchical list of project locations.
- Quantity: The total amount of work or deliverables required for this line item. (Optional, as applicable)
- Unit of Measurement (UOM): The standard unit used to measure the quantity (e.g., SF, CY, LF).
- Effort Hours: The estimated total time required to complete the tasks covered by the budget line item measured in man-hours.
- Budget: The total financial allocation for this specific budget line.
Cost Type Breakdown:
- Labor: The estimated cost of the workforce required to complete this task.
- Material: The projected cost of all raw materials, supplies, and consumables needed for the work.
- Equipment: The anticipated cost for renting, operating, or utilizing the machinery and tools required for the job.
- Subcontractor: The budgeted cost for the work assigned to an outsourced trade or specialty contractor. (if applicable)
- Others: Any miscellaneous project expenses (such as permits or fees) that do not fit into the standard categories above.
- Overhead: The indirect operational costs applied to this task. The system auto-calculates this based on the payment terms in your established commitment contract, though you can manually override the field if necessary.
- Profit: The anticipated financial margin for this specific work item. The system automatically calculates this by subtracting the sum of your allocated costs from the total budget amount.
3. Build and Manage Rows
- Add a new row: Click '+Add New item' to build your budget line-by-line at the bottom of the list.
- Insert a row: Right-click on an existing line and select 'Add New Row 'to insert a new row directly below it.
- Delete a row: To remove a budget line added inadvertently, select the row by clicking its serial number and click the Trash Can icon at the top left of the table. Alternatively, right-click on the line and select 'Delete'.
4. Save Your Progress
- Click 'Save' to store your work.
You can progressively create the budget from your saved draft at any time. See 'Save, Advance, and Finalize Your Budget' below to learn how to manage your progress, unlock parallel workflows, and lock your financial baseline.
Import Your Budget File
1. Download the Excel Template
- Click 'Download' on the Budget Upload screen to obtain the budget template in Excel format. This file contains all the required column headers for a successful import.
2. Prepare Your Budget File
- Enter your budget values into the template. Keep the following requirements in mind as you build your file:
- Each row in the spreadsheet must contain only one budget line item.
- Ensure that each line item represents a task entry with a distinct cost code.
General Item Details:
- Cost Code: The code representing the division or category of work, according to your company's master list.
- Description: The name or label of the work item or deliverable.
- Quantity: The numeric value of the planned amount of work required. (Required only for self-assigned line items; leave blank if assigning to a subcontractor).
- UOM: The unit of measurement for the work completed (e.g., SF, CY, LF). (Required only for self-assigned line items; leave blank if assigning to a subcontractor).
- Effort Hours: The estimated total labor required to complete the task, measured in man-hours. (Required only for self-assigned line items; leave blank if assigning to a subcontractor).
- Budget: The total financial allocation for this specific budget line.
Cost Type Breakdown:
- Labor: The estimated cost allocated for workforce wages.
- Equipment: The estimated cost allocated for the use or rental of machinery and tools.
- Material: The estimated cost allocated for all raw materials and supplies.
- Overhead (Optional): The indirect operational costs applied to this task. If you leave this blank, the system will auto-calculate it based on your established payment commitment contract terms. If you enter a value, it will supersede the auto-calculated amount.
- Others: Miscellaneous project expenses (e.g., permits, transportation, handling, or vendor fees) that do not fit into the standard categories.
- Subcontractor: The budgeted cost for the work assigned to an outsourced trade or specialty contractor. (If applicable)
- Others: Miscellaneous project expenses (e.g., permits, transportation, handling, or vendor fees) that do not fit into the standard categories.
- Profit (Optional): The anticipated financial margin for this item. If left blank, the system automatically calculates this after upload by subtracting your allocated costs from the Total Cost. If you manually enter a value that doesn't mathematically align, the system will alert you to correct it upon upload.
Once complete, save the Excel file to your computer with an appropriate name.
3. Upload the Budget
- On the 'Budget Upload' screen, click 'Browse' and navigate to your saved Excel file, or simply drag and drop the file directly into the upload box.
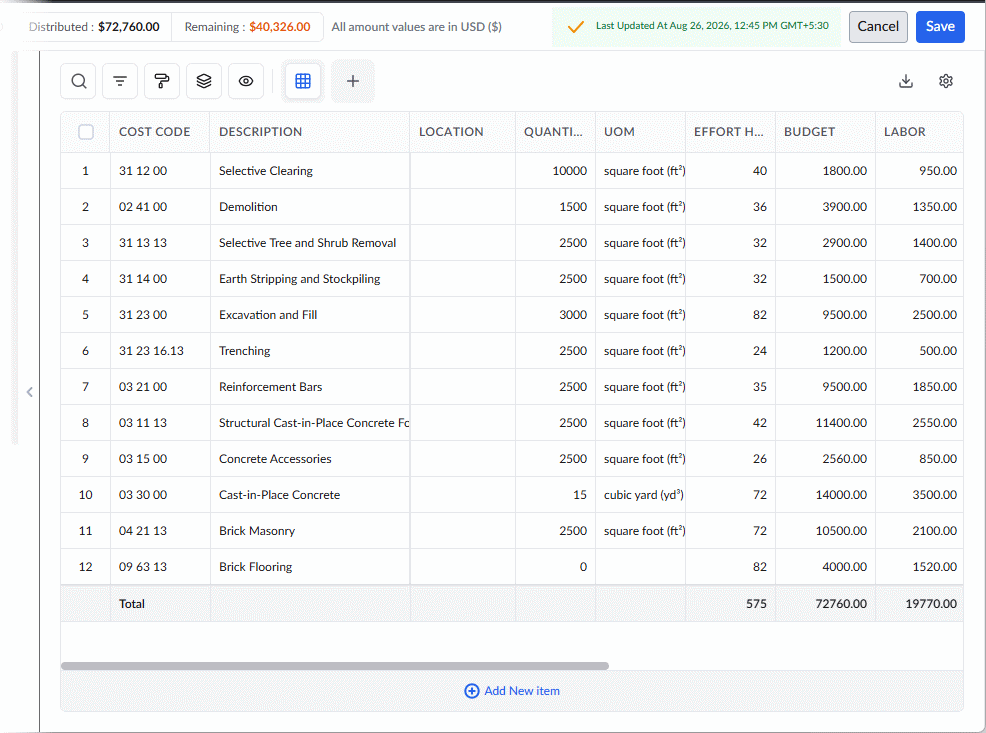
The draft project budget is created. Any missing or inappropriate values are highlighted in red.
4. Edit the values and correct the errors, if any. - Click inside the cell and enter/select the correct entry.
5. Specify the location (Optional) - Click inside the 'Location' column of each row and select area, region, or spot in the site where the work item is executed. This is optional.
6. Build and Manage Rows
- Add a new row at the bottom: Click '+ Add New Item' to create a new budget line and enter its details. For example, add an 'Unallocated' line item with cost code 99-999 to hold any remaining contract amount—serving as a reserve pool to fund deficient line items after locking.
- Insert a row: Right-click on an existing line and select 'Add New Row 'to insert a new row directly below it.
- Delete a row: To remove a budget line added inadvertently, select the row by clicking its serial number and click the Trash Can icon at the top left of the table. Alternatively, right-click on the line and select 'Delete.
4. Save Your Progress
- Click 'Save' to store your work.
Save, Advance, and Finalize Your Budget
You can develop the budget incrementally, adding and editing rows over time until the overarching budget is officially locked. Each time you save, the distributed amount and remaining balance displayed at the top of the screen will automatically update.
- Parallel SOV Configuration: You can start configuring your project Schedule of Values (SOV) using your currently available budget lines. You can then seamlessly finalize the SOV once the master budget is fully locked. See Configure Project SOV with Budget Line Items for guidance.
Best Practices for Finalizing Your Budget
- Distribute the Full Amount: Ensure your entire contract amount is fully distributed across your budget line items before locking.
- Create a Reserve: We highly recommend adding a specific line item with the cost code 99-9999 and the label Unallocated. Assign your remaining or reserved funds to this line. Even after the budget is locked, these unallocated funds can be easily shifted to other budget lines to cover evolving project needs. See Budget Adjustments for more details.
Once your budget is fully built, lock it to secure your definitive financial baseline and prevent unintended changes to the total amount.
Lock the Budget
To ensure financial accuracy, the system requires a few prerequisites before this action can be taken. The Lock button will only appear at the top-right of your screen once the following conditions are met:
- The total contract amount has been exhaustively distributed across your budget line items.
- The remaining balance from the contract amount is exactly zero.
- Your Commitment Contract has been officially finalized and locked.
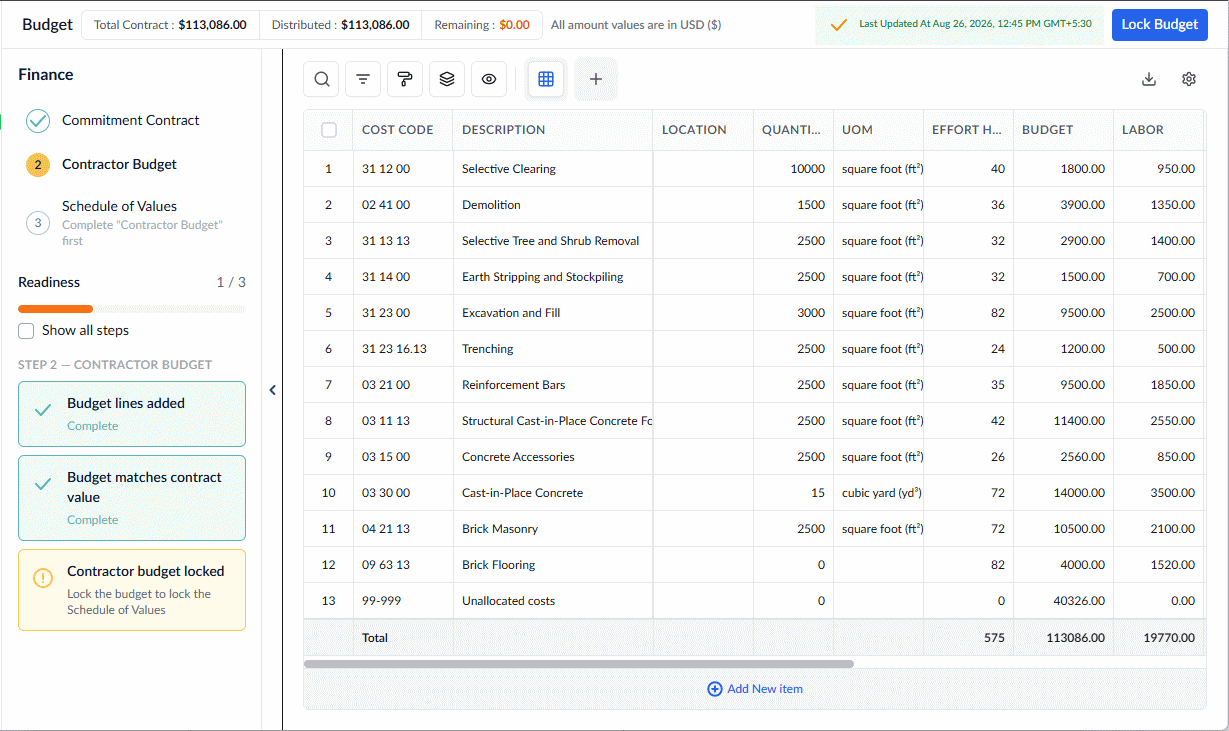
To lock the budget
- Click the 'Lock Budget' button at the top-right
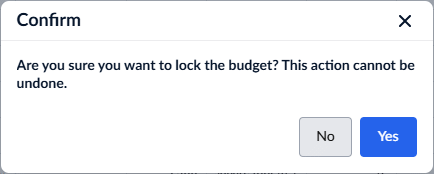
- Click 'Yes' to confirm your action.
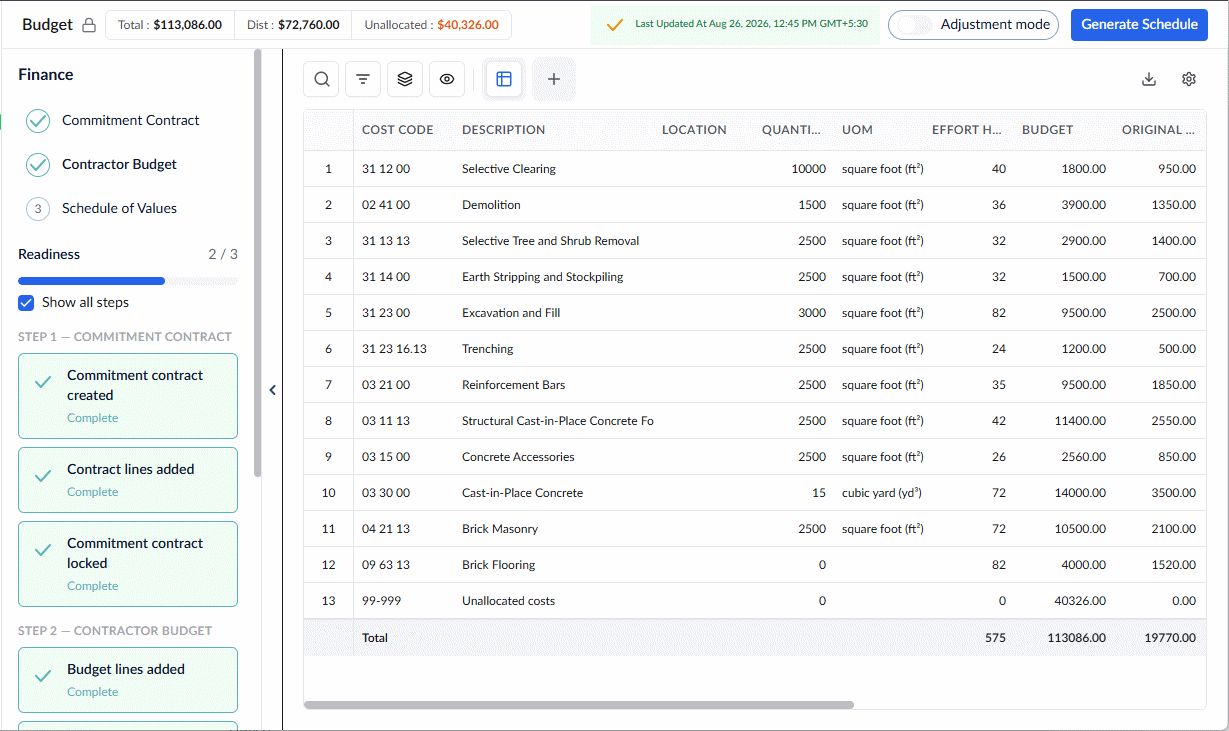
The side panel on the left displays your budget setup progress within the overall project financial workflow.
Next Steps:
- Set Up Your Project SOV: Generate draft SOV lines from your budget, then group and consolidate items into custom billing categories to establish a locked financial baseline for payment applications.
- Generate a Draft Schedule (Optional): You have an option to auto-generate an initial draft of your project schedule directly from your locked budget line items to jump-start your planning.
- Allocate Funds to Work Items: Assign budget amounts directly to scheduled tasks. This auto-generates a planned billing schedule, making it easy to issue periodic, progress-based invoices to the Client (General Contractor or the Owner).
Was this article helpful?
That’s Great!
Thank you for your feedback
Sorry! We couldn't be helpful
Thank you for your feedback
Feedback sent
We appreciate your effort and will try to fix the article