The Subcontracts module allows you to formalize agreements with your subcontractors by creating detailed commitment contracts. To streamline this process, the system automatically pulls the cost breakdowns and timeline terms directly from the master budget line items you have assigned to them.
Once you publish a commitment contract, the subcontractor is automatically notified to review the terms and cost assignments.
The Review & Acceptance Workflow
Upon reviewing the published contract, the subcontractor has two options:
- Accept the contract: They agree to the terms and financial assignments as presented.
- Request a revision: They request adjustments, allowing you to revise the details and republish the contract for a new review.
Post-Acceptance & Locking Mechanics
Once the subcontractor officially accepts the assignment, the following actions secure the project's financials:
- Budget Lines Lock: The specific line items assigned to that subcontractor are officially locked within your overarching master budget.
- Lock the Commitment: As the General Contractor, you can now lock the commitment contract itself to prevent any accidental changes or unauthorized edits.
- Subcontractor Baseline Established: The accepted contract amount serves as the definitive financial baseline for the subcontractor, allowing them to construct their own detailed budget and Schedule of Values (SOV).
Finalizing Subcontractor Financials
After the subcontractor finalizes their budget, they will submit their SOV to you for review. Upon your approval, their financial setup is fully established. From this point forward, any further amendments or financial revisions must be executed exclusively through approved Change Orders.
Note: Before setting up a subcontractor commitment, ideally ensure the relevant budget line items have been committed to that subcontractor within your master budget (see Commit Budget Lines to Subcontracts). However, if needed, you also have the flexibility to pull more budget lines and commit them or remove pre-committed items on the fly while configuring the contract.
To initialize the commitment contact set up
Open the Commitment Contracts screen. To do so:
- Click the main menu at the top-left and select 'Subcontracts' under 'Finance'
- Select 'Commitment Contract' on the left
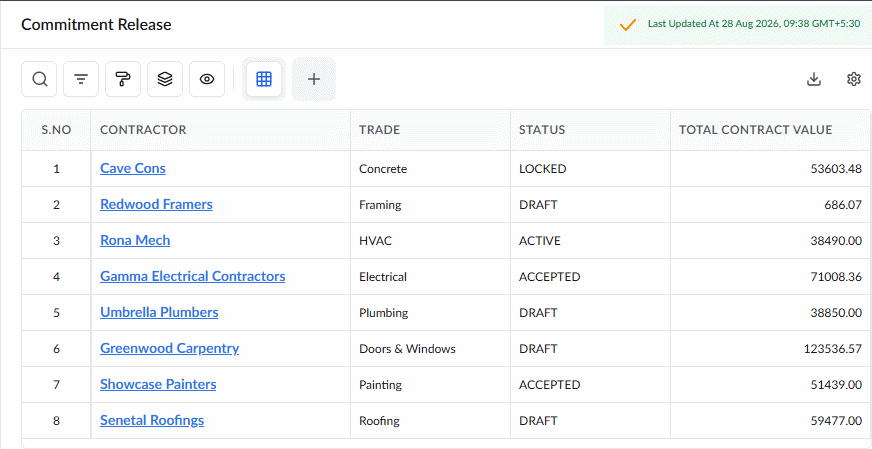
The screen shows the list of subcontractors and their trades.
Contractor - The name of the subcontractor company. Click the name to open the commitment contract pertaining to the subcontractor
Trade - The division of work assigned to them
Status: Indicates the current state of the commitment contract between you and the subcontractor. The possible values are:
- Draft: The General Contractor has created the contract and is preparing to send it to the subcontractor.
- Active: The contract is currently under review and awaiting approval or acceptance from either party.
- Accepted: The subcontractor has accepted the contract, and it is awaiting final locking by the General Contractor.
- Locked: Both parties have agreed to the terms, and the General Contractor has finalized and locked the contract.
Total Contract Value - The total amount of the contract, calculated as the sum total of all master budget line items assigned to that subcontractor.
- Click the name of a subcontractor to open their commitment contract
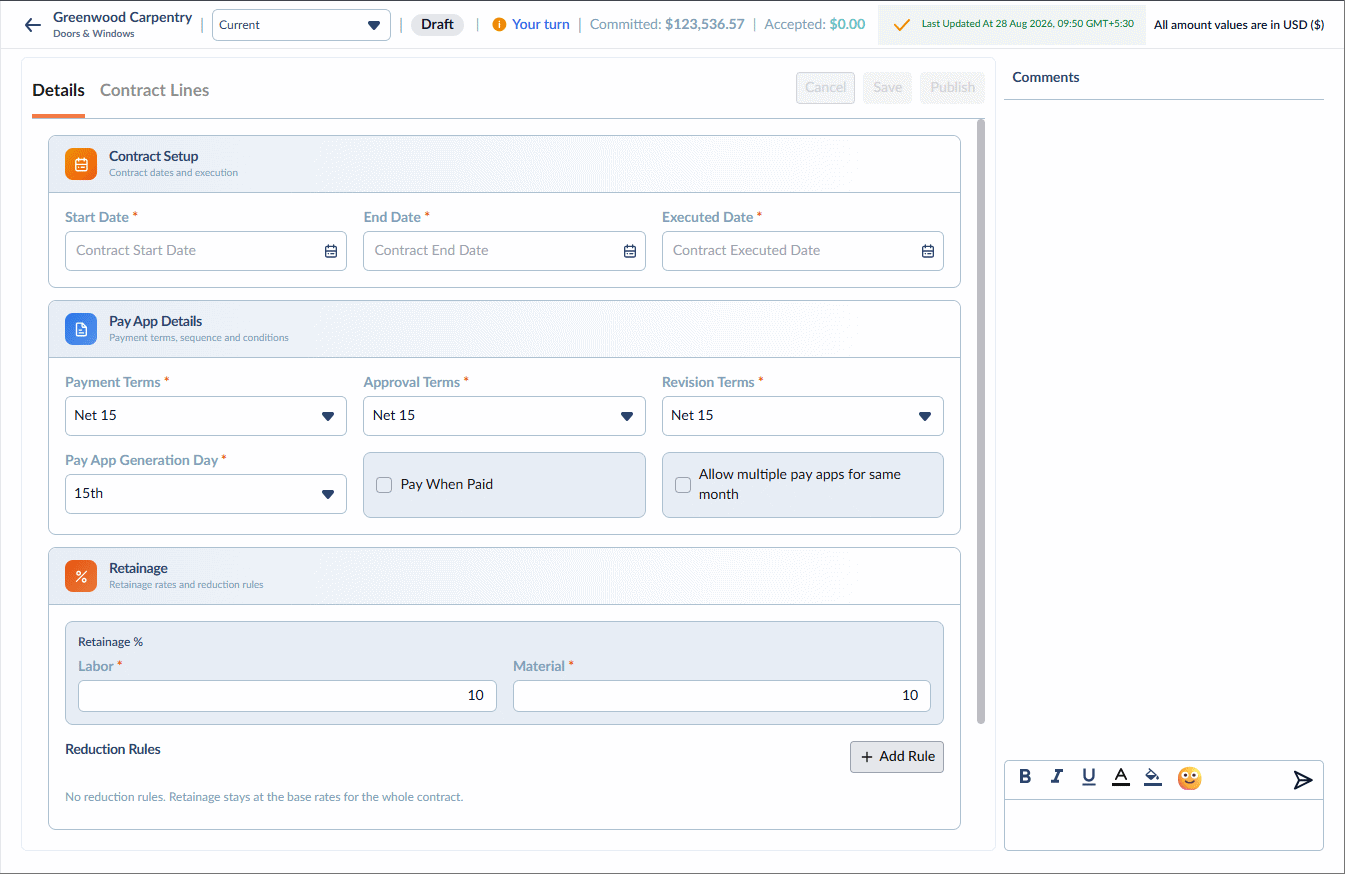
Setting up the commitment contract for a subcontractor involves the following steps:
- Step 1 - Enter Contract Details
- Step 2 - Save the Contract File (Optional)
- Step 3 - Set up the Contract Cost Breakdown
Step 1 - Enter Contract Details
On the main contract screen, configure the overarching timeline and payment terms. Click inside any date field to open the calendar picker.
Contract Setup
- Start Date: The official commencement date for contracted work and subcontractor obligations. Note: This date cannot precede the overarching project start date.
- End Date: The contractual deadline for delivering all scope items. Note: This date cannot exceed the end date mentioned in the prime contract settings.
- Executed Date: The date the contract is formally signed and legally binding between the General Contractor and the Subcontractor.
Pay App Details
- Payment Terms: The agreed-upon payment timeline following the invoice date (e.g., Net 30 means payment is due 30 days after invoice receipt).
- Approval Terms: The agreed-upon timeframe for reviewing and approving pay applications (e.g., Net 15 requires approval within 15 days).
- Revision Terms: The allowed timeframe and conditions for the General Contractor to request revisions and for the Subcontractor to resubmit a Pay App.
- Pay App Generation Day: The specific calendar day of the month when a Pay App becomes eligible for official submission. While draft Pay Apps can be created at any time during the month, the system restricts formal submission until on or after this designated date.
- Pay-When-Paid: Enable this option if subcontractor payments are contingent upon the General Contractor receiving funds from the Project Owner.
- Allow Multiple Pay Apps for the Same Month: Enable this setting to allow Subcontractors to draft multiple Pay Apps throughout the billing cycle as work progresses or milestones are met. The system automatically consolidates these drafts for a single submission on or after the designated billing date. This feature also enables Subcontractors to submit standalone Pay Apps specifically for retainage release claims.
Retainage Settings
Retainage - The portion of each payment withheld by the General Contractor until the project (or scope) is satisfactorily completed. Subcontractors can claim withheld retainage progressively throughout the project lifecycle. You can apply retainage to labor costs, material costs, or both.
- Labor: Enter the percentage to withhold from the labor and equipment cost components of each task based on its monthly billed progress.
- Material: Enter the percentage to withhold from the material cost component of each task based on its monthly billed progress.
Retainage Reduction Rules
Set up rules to automatically reduce the retainage percentage as the project progresses. When a reduction rule is triggered, the subcontractor becomes eligible to claim the released portion of the withheld retainage, calculated from the difference between the previous and new retainage rates, as a dedicated pay app.
- Click '+ Add Rule' and enter the following parameters:
Billed Percentage: The completion threshold (billed progress percentage) at which the retainage rate decreases.
Work Retainage: The revised retainage percentage applied to the labor cost component once the threshold is reached.
Material Retainage: The revised retainage percentage applied to the material cost component once the threshold is reached.
- Click '+ Add Rule' and repeat the process to create additional milestones for descending retainage rates
- Click 'Save' to confirm the details
Step 2 - Save the Contract File (Optional)
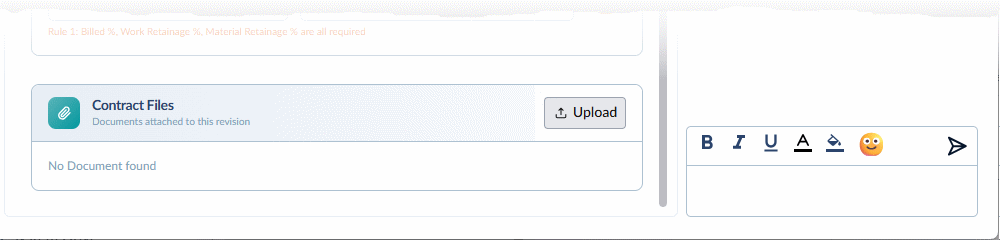
- Click the 'Upload' button to attach a PDF version of your executed contract document.
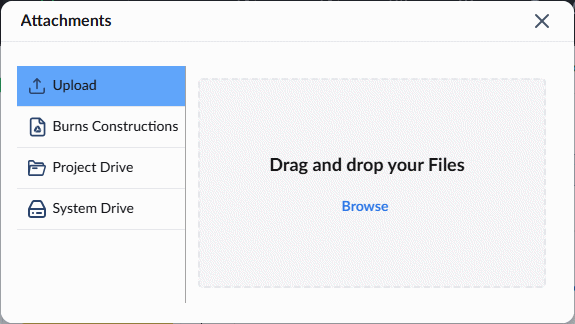
You can upload the file using one of two methods:
- From your device: Drag and drop the PDF into the designated box, or click Browse to locate the file on your computer.
- From the project repository: Select the appropriate drive from the left menu and navigate to the existing file within the system.
- Click 'Save'
Once saved, the document is automatically archived in the project's cloud-based file repository under the following path: System > Finance > [Company Name] > Prime Contract.
For further guidance on accessing archived documents, please refer to the View and Download Files article.
Step 3 - Set up the Contract Cost Breakdown
- Open the 'Contract Lines' tab
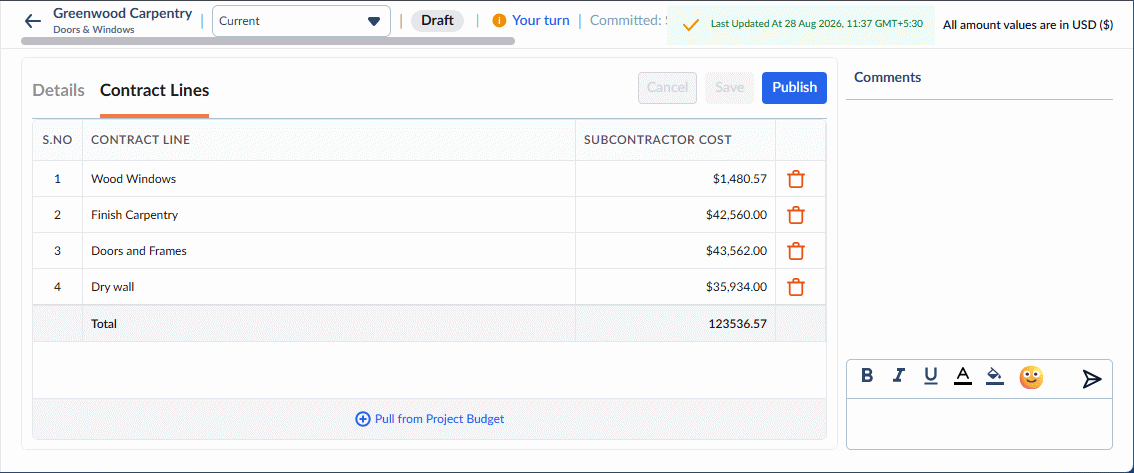
The contract cost breakdown shows the lines from the budget commited to the contractor to start.
You can optionally add more budget line items to the contractor's commitment or remove existing lines on-the-fly.
To add more budget lines
- Click 'Pull fom the Project Budget'
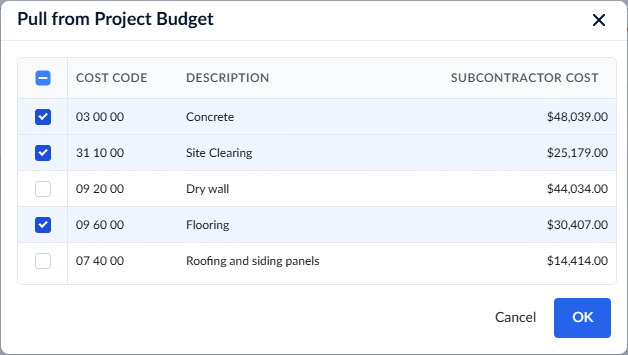
A pop-up will display a list of budget items pre-committed to the contractor, as well as unassigned items in the master budget.
- Use the checkboxes on the left to select new lines to add or unselect items to remove from the commitment.
- Click 'OK'
- Click 'Save' to confrim your budget allocation
- Click 'Publish' to forward the commitment to the respetive contractor for their review and acceptance.
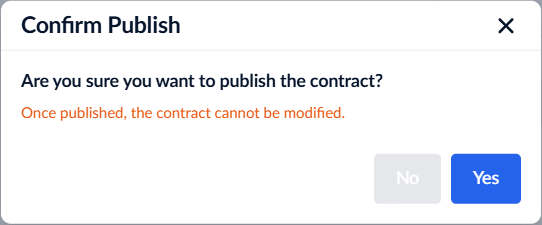
- Click 'Yes' to confirm.
Once published, the status of those specific master budget lines changes to 'Published'. The subcontractor is notified to assess the contract.
The details at the top of the contract screen will now show the current version of the commitment contract, status, 'Ball in Court' party, the total commitment value, and the commited amount.
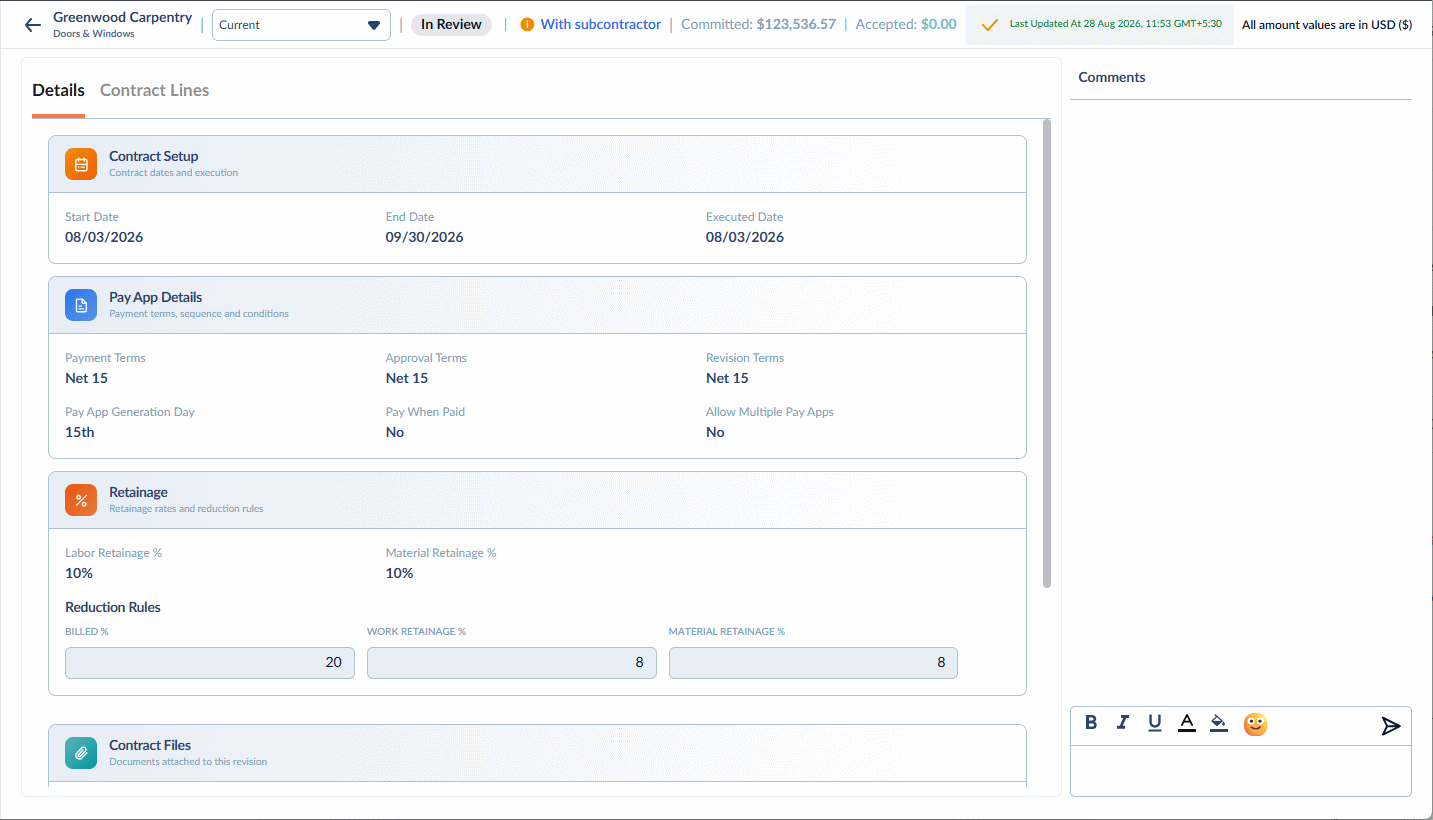
Use the 'Comments' pane on the right side of the screen to communicate with the subcontractor and log any notes about the agreement.
Next Steps:
- Reconcile the Commitment Contract: If the subcontractor requests a revision, you will need to adjust and republish.
- Lock the Commitment Contract: Once the subcontractor accepts, lock the contract to finalize it.
Was this article helpful?
That’s Great!
Thank you for your feedback
Sorry! We couldn't be helpful
Thank you for your feedback
Feedback sent
We appreciate your effort and will try to fix the article