The Takeoff feature lets you create clearly labeled takeoff markups directly on any plan sheet with their auto-calculated dimensions. Each markup is added as an individual layer, making it easy to organize and manage the elements through the Layer Editor panel located alongside the drawing.
Once you've created a group of markups elements, you can save them collectively as a Takeoff Set for future reference or reporting. This ensures consistent tracking of quantities across multiple sessions or team members.
Each markup element displays its dimensions in two places:
- Directly on the drawing, adjacent to the markup, for quick visual reference.
- Within the Layer Editor on the left, which lists all elements in the markup set along with their corresponding measurements.
This dual-view system allows for efficient quantity takeoff management, making it easy to review, modify, or export data as needed.
You can view, access, and manage the takeoff markups from the Takeoff screen in the Plans module. See View and Manage Takeoff Markups for more details.
Background - Linarc's intelligent AI algorithm processes each uploaded plan sheet, automatically detecting and saving the drawing's scale. When you create an area or length markup, the system uses this scale to instantly calculate and save its dimensions (length, width, and area). If the auto-generated measurements seem inaccurate, you can easily adjust them. See Recalibrate a Drawing for guidance.
To create takeoff markups
- Ensure you have the correct plan sheet open. If you are not already on the plan sheet:
- Click the main menu in the top-left corner and select 'Plan Sheets' under 'Documentation.'
Tip: Hold down the Cmd (Mac) or Ctrl (Windows) key while clicking to open the plan sheets screen in a new browser tab.
- Click the thumbnail of the plan sheet to open
- Set the 'Take Off' toggle switch to 'ON'
Use the links below to jump to the section you need help with:
Add Length Measurements
You can use the line tool or the ruler to highlight the length or distance to be measured and recorded as takeoff
To add a length measurement
- Click the down arrow/line beside the arrow and choose the line tool.
- Click the spot on the plan where you want to place the markup and drag it to draw the line/arrow.
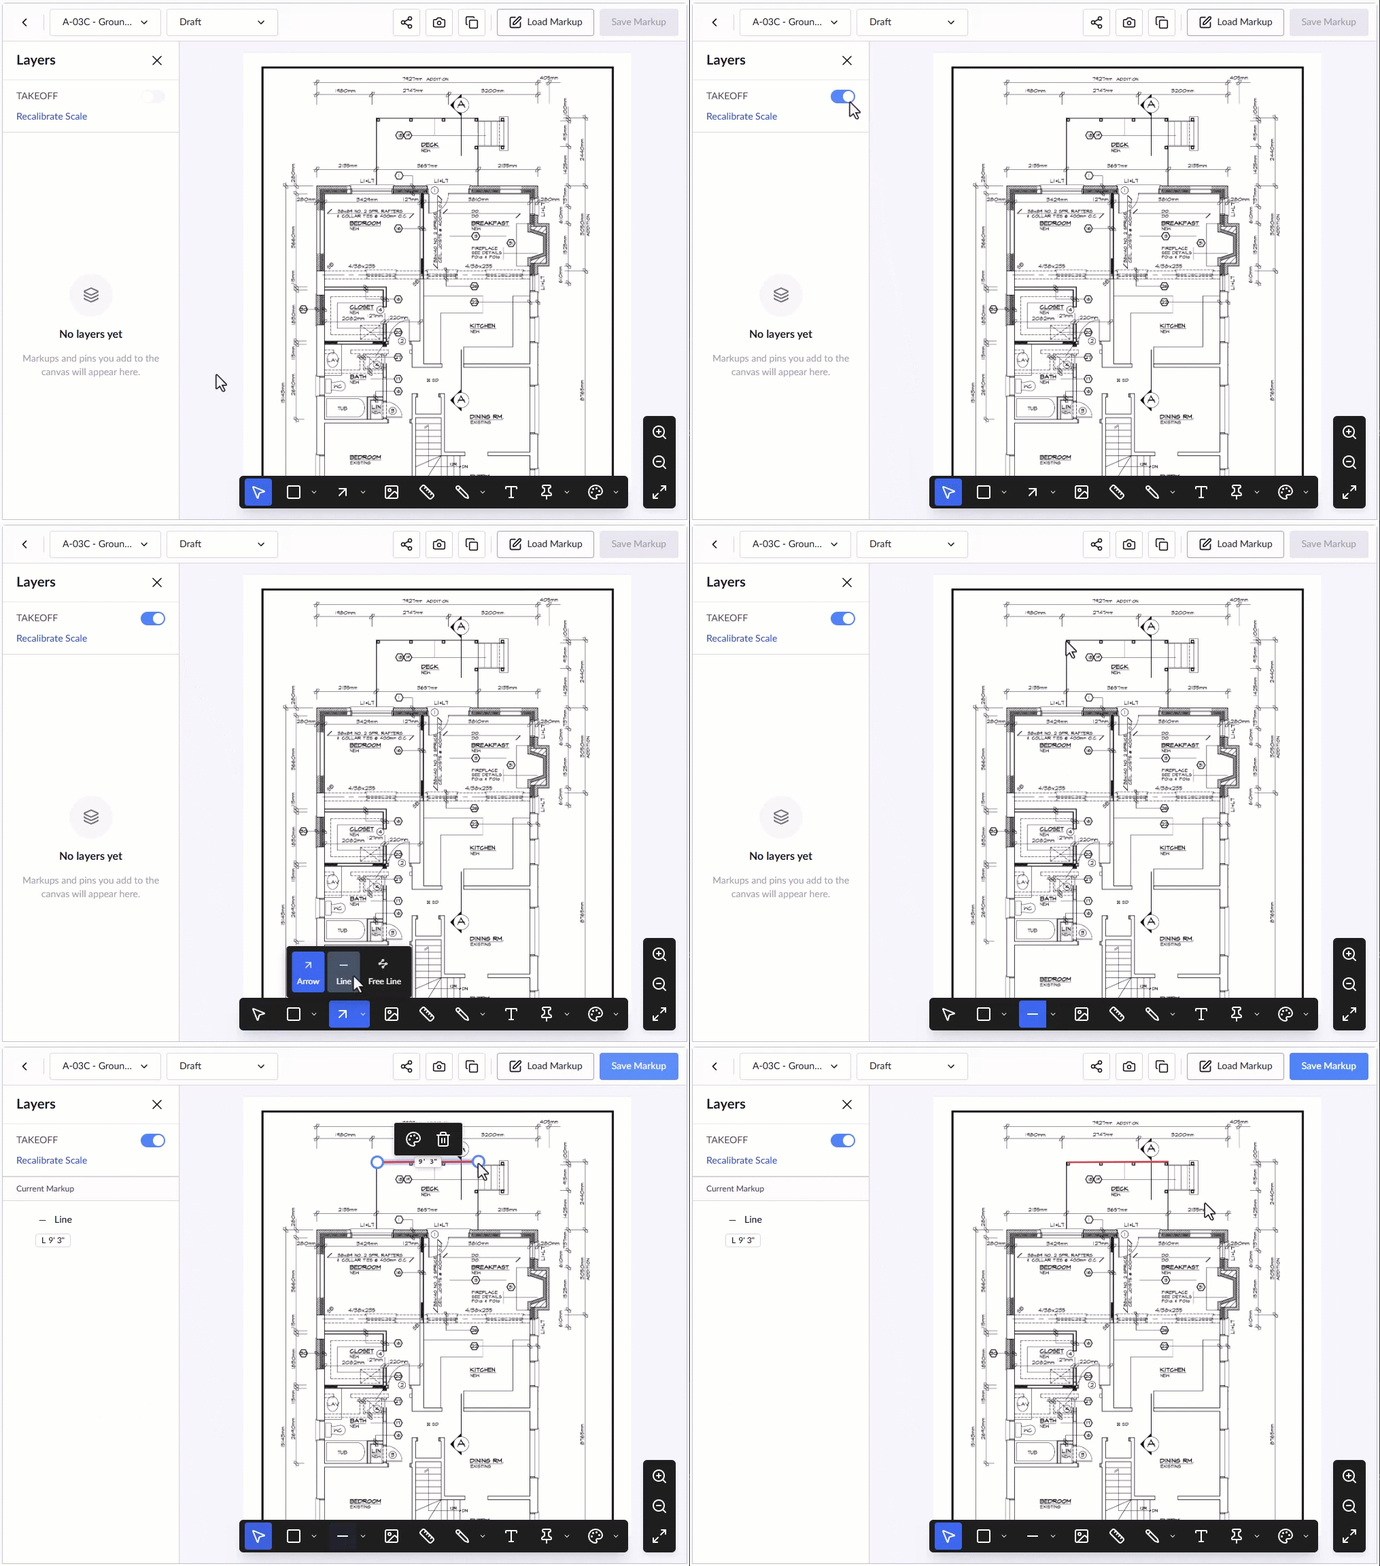
- Use the handles at either end of the line to rotate or resize it for precise alignment and length.
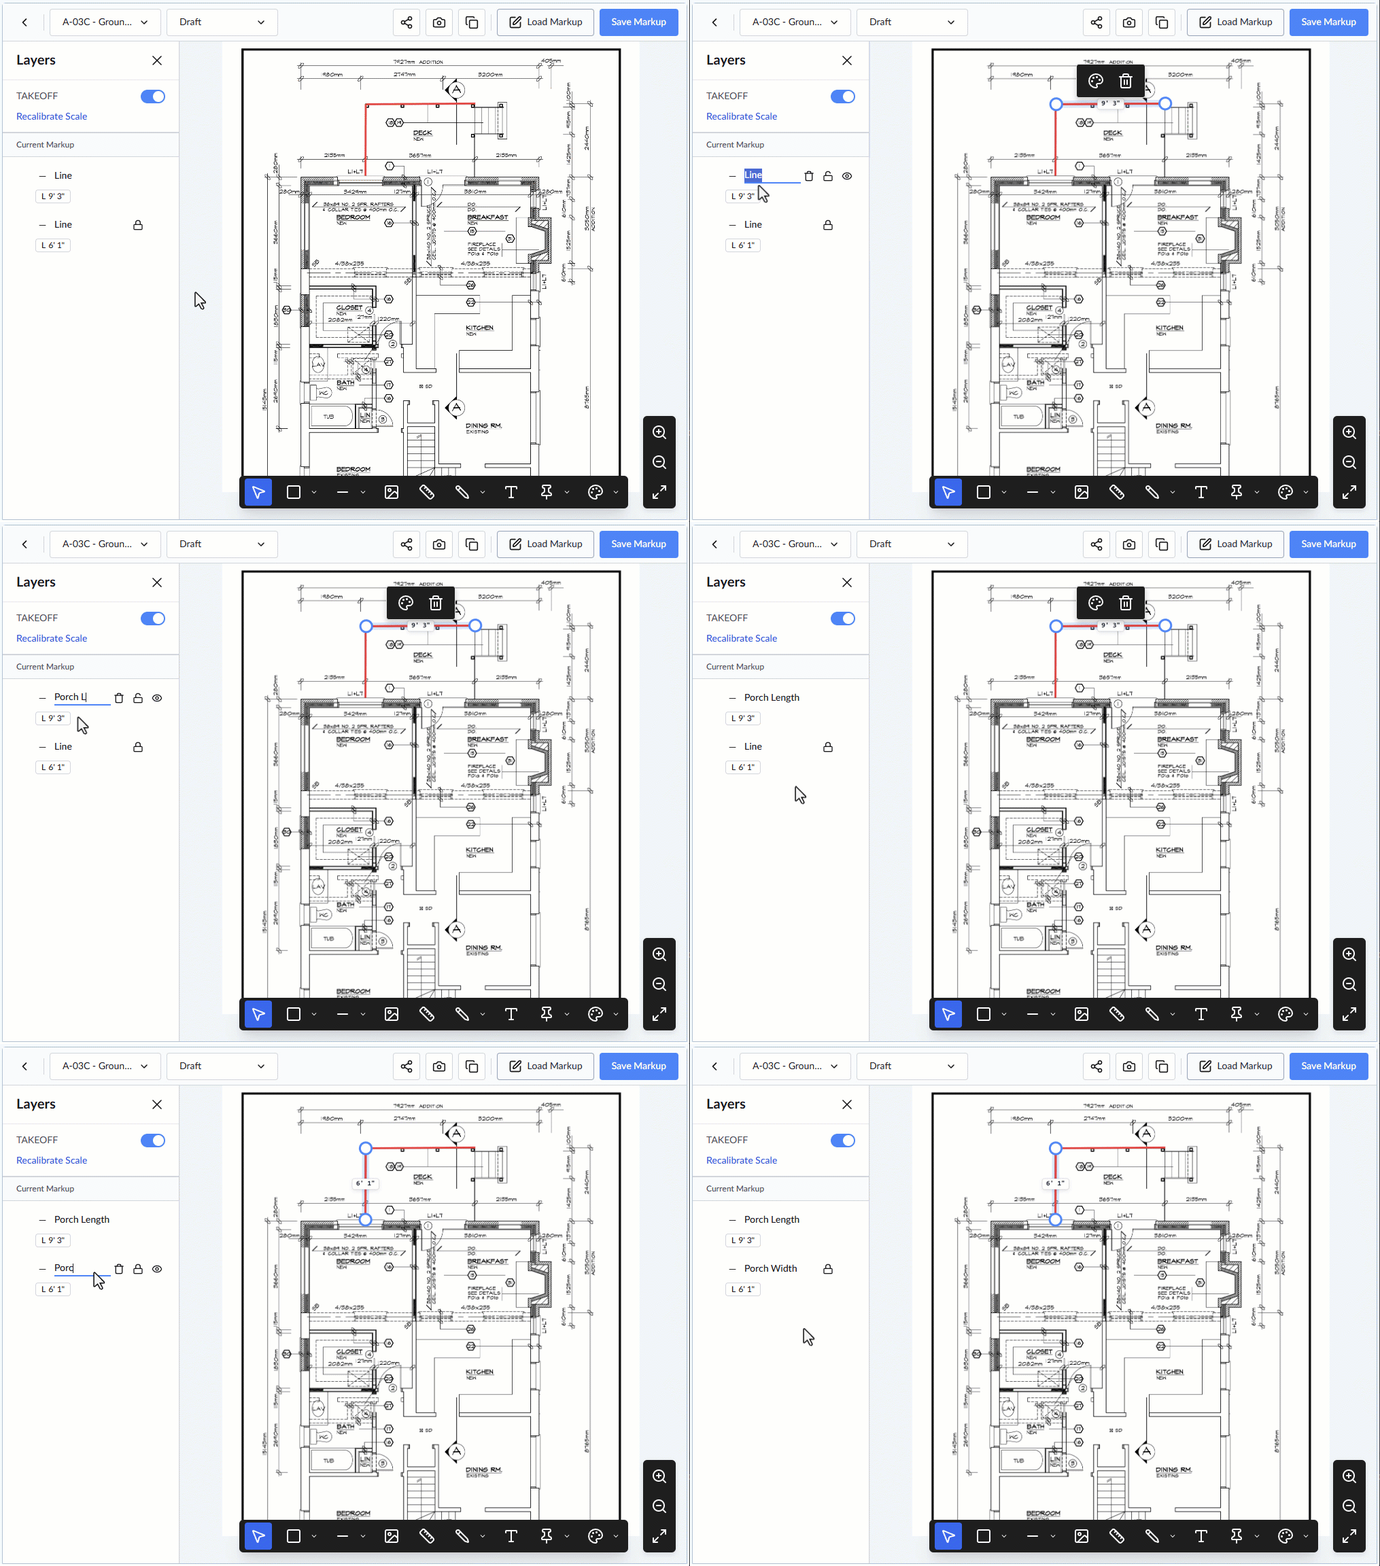
The line is added as a new layer in the drawing and appears in the Layer Editor on the left with its calculated dimension and a default label.
- Repeat the process to add more takeoff markups as needed
- Click the label to rename it with a short, meaningful description of the takeoff measurement (e.g., "Wall A - Length").
Add Area Measurements
You can select from a variety of shape tools to highlight areas for takeoff measurement:
- Shape Tools – Rectangle, Circle, Ellipse,
- Cloud Tool
- Freehand Polygon
The instructions below explain how to use a regular shape to mark an area. The process is similar for other freehand shape tool.
To add an area measurement
- Click the 'Shape' tool (the second icon from the left in the top toolbar).
- If your desired shape is not currently visible, click the dropdown arrow next to the icon to choose from the following options:
- Rectangle: Draw a square or rectangular box to measure standard four-sided spaces.
- Circle: Draw a perfect circle to calculate radius-based areas.
- Ellipse: Draw an oval shape to cover irregular or curved spaces.
- Cloud: Draw a cloud-shaped boundary. (Best for tracking revision changes, patchwork areas, or rough quantity estimations where exact perimeter precision is not required).
- Click and drag your cursor over the plan to roughly draw the shape.
- To reposition the markup, click and drag the shape to your precise target area.
- To resize the shape, click and drag any of its corner handles.
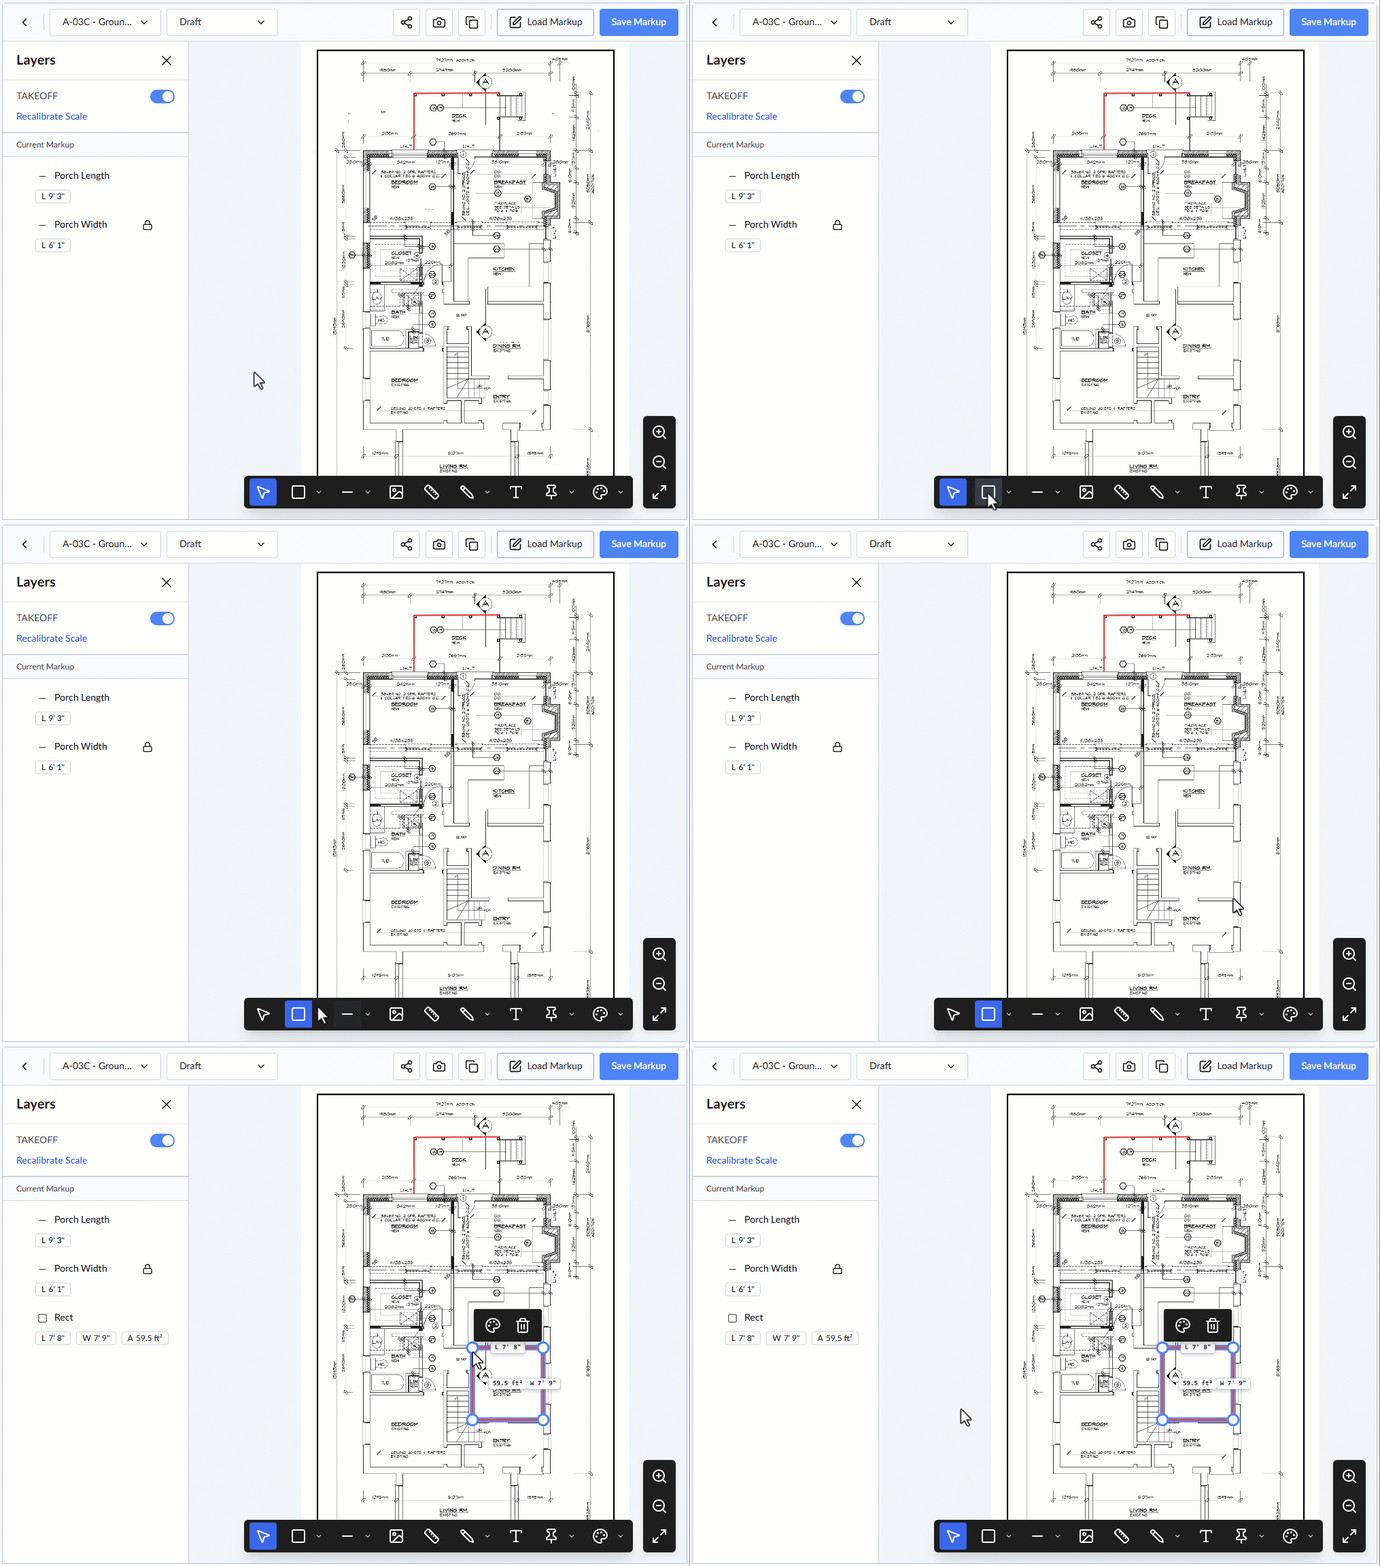
- Draw the shape roughly on the spot using a click-and-drag action.
- Click and drag the shape to position it precisely where you want it.
- Use the corner and side handles to resize the element as needed.
The markup is added as a new layer in the drawing and appears in the Layer Editor with its auto-calculated dimensions and a default label.
- Click the label to rename it with a clear and concise description of the takeoff measurement (e.g., "Dining Room – Floor Area").
Save the Takeoff Measurements
After adding all your measurement markups, the final step is to save them as a takeoff entry for future reference and reporting.
To save the Takeoff Markup
- Click 'Save Markup' at the top-right.
- Enter a descriptive label summarizing the purpose of the takeoff (e.g., "Ground Floor – Granite Flooring").
- Click OK to confirm and save.

Your takeoff is now stored and can be easily accessed from the 'Takeoff' screen within the Plans module.
For more information, see View and Manage Takeoff Markups.
Was this article helpful?
That’s Great!
Thank you for your feedback
Sorry! We couldn't be helpful
Thank you for your feedback
Feedback sent
We appreciate your effort and will try to fix the article