Credit Change Orders, also known as Deductive Change Orders, are used to reduce the proposed amounts for specific line items in a project’s budget or cost estimates. These orders are typically created by entering negative values for the affected items in the estimates, using the appropriate cost codes to reflect the reduction accurately.
General Contractor
The general contractor can:
- Enter negative estimates for various components such as quantity, planned work hours, or cost values for materials, labor, equipment, etc., related to the impacted work items as their estimates.
- Ensure the correct cost codes are used for proper alignment with the original budget line items.
- Once approved, the Credit Change Order can be linked to the project budget, enabling budget amendments that reflect the reduced amounts for the respective line items.
Subcontractor
The subcontractor can:
- Create a work cost estimate with negative values for quantities, hours, or cost components (materials, labor, equipment, etc.) associated with the relevant work items.
- Apply the appropriate cost codes to maintain consistency with the original estimate structure.
- Upon approval, the Credit Change Order can be linked to their project estimate, allowing for accurate updates to reflect the revised scope or cost.
Adding a contract change order involves the following steps:
- Step 1 - Create a Credit CO
- Step 2 - Add more details, the description, and watchers
- Step 3 - Add your estimate
Step 1 - Create a Credit CO
- Ensure that you are on the change order module of the project's management console. If not:
- Click the app launcher
 and select 'Finance,' and click 'Change Order' at the top
- Click the app launcher
- Select 'Boards' on the left.
- Click the '+ Create CO' button on the top right.
The change order creation wizard starts:

- Choose 'Contract' at the top
- Enter the details:
- Change Order Title - A label for the CO shortly describing it (Max. 150 characters)
- CO Type - Choose the type of the CO based on its reason
- CO Sub Type - Select the sub-classification depending on the chosen type
- Priority - Specify the criticality of the CO
- Sequence - Specify the category of the change order as classified per your company practices. The change order will be numbered in a series, depending upon the category. This numbering lets you quickly identify, filter/review change orders of a particular type.
- Click 'Create'
The change order opens at the 'Details' tab for adding more particulars:

The screen contains the following tabs:
- Details - Add general details like the due date, the description for the change order, and more. You can also add your colleagues to be notified of the progress of the CO, as watchers. The 'Activity Log' at the top right shows the history of actions on the CO.
- My Estimate - Enter your cost estimate for the change. For credit change orders, specify the deductions from project budget line items, along with the appropriate cost codes. If the CO is created by the General Contractor (GC), they can input value changes for the budget items under their responsibility.
- Work Cost - Applies only to General contractors - Submit budget amendment requests from contractors for the line items assigned to them. They can submit their cost differences entered as negative values as their estimates.
- CO Value - Applies only to General contractors - Determine the final cost impact of the CO after reviewing and accepting contractor estimates. This final value is used to proceed with the formal approval process.
- Email - Share the change order with participants external to the Linarc platform via email to gather their inputs. This functionality enables any stakeholder to generate a PDF version of the change order, capturing all details at its current stage, and forward it to external parties. Upon receiving responses, stakeholders can seamlessly incorporate the feedback and proceed with the change order workflow.
Step 2 - Add more details, the description, and watchers
The mandatory fields in the 'Details' page are inherited from the details entered in the previous step. You can set a due date and add optional details, and a description of the cost change with supporting attachments.
Ensure that you are in the 'Details' tab and add the following details:
- Due date - The date before which the change order should be closed. Use the calendar and specify the due date for the CO.
- Specification Code - The section in the project spec book related to the tasks and deliverables involved in the change work. Select the spec code from the drop-down. (optional)
- Sheet Code - The plan sheet that references the change work. Choose the plan sheet number from the drop-down (optional)
- Location - The location of the constructed structure to which the CO refers, if applicable. You can specify the spot from the list of locations defined for the project. As a prerequisite, the project should have been uploaded with a hierarchical list of locations. See Add Multi-Tiered Locations to a Project for more details.
- Description- Enter a description explaining the change work in detail.
- Use the tools at the top to format your text and add emojis, insert hyperlinks, tables, etc.
- Click the paper clip icon to add attachments to your description
- You can edit the description at any time before you route the CO to the next step
- Attachments - Click
 on the top right to add attachments like photos and documents to the description.
 - Linked Items - Click 'Link Item' on the right to add the related line item in the budget or any previous change order.
Add Link a budget line item (Optional)
- Click '+Link item'
- Choose 'Budget Item' from the drop-down at the top

- Select the line item to link
- Click 'Add'
- Repeat the process to link line items as required
Add Watchers
The 'Watchers' pane allows you to specify your team members to notify them of the change order progress and details. Linarc sends a notification to the persons on each activity on the change order. If given access, they can view the details at each step from their Linarc project consoles.
- Start typing the name of the person in the text field under 'Watchers' and choose from the options.

- Click 'Add'
- Repeat the process to add more watchers
See Add and Manage Watchers for more guidance.
Note:
You can add only the persons belonging to your company and who are included in the project team. See Manage Project Team Members for more details on adding project team members.
Step 3 - Add your estimate
The 'My Estimate' tab lets you add your estimate for the change order as an Excel file. You can download the template file, enter the values, and upload the same as your estimate. The tab is enabled only after you fill out all mandatory fields under the 'Details' tab.
General Contractor - This is optional. You can submit your estimate for any self-performed work. Otherwise, skip to inviting work cost estimates from your subcontractors.
Subcontractor - You can submit your bid proposal for the change order you create
You can submit your estimate in two ways:
Create your estimate
- Click the 'My Estimate' tab

- Click 'Create' and start adding line items one by one.
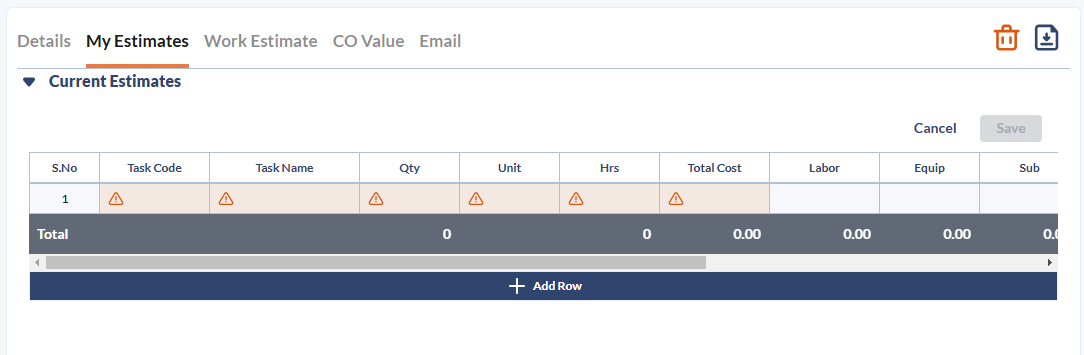
- Each line in the file should contain one task entry.
- Mandatory fields are highlighted with red borders
- Enter the values for the tasks under the following column headers.
- Task Code - The cost code of the line item. Ensure that the cost code you select aligns with the cost code of the budget line item to be adjusted.
- Click inside the cell and select the code from the 'Company Task Codes' pop-up. The pop-up allows you to search for the codes using a partial cost code or the task name as the search criteria.
- Task Code - The cost code of the line item. Ensure that the cost code you select aligns with the cost code of the budget line item to be adjusted.
- Name - The label of the task or deliverable. Auto-populated once the cost code is selected.
- Double-click inside a cell to enter the following values. For the credit change order, enter the quantity, time and monetary values as applicable as negative numbers (with a - sign). These negative values are shown in red.
- Qty - The amount of work to be reduced from the planned work.
- Unit - The unit by which the amount of work done is measured
- Hrs - The reduction in the total labor effort needed to complete the task, measured in manhours
- Labor - The reduction in manual labor cost estimated for the job
- Equip - The reduction in estimate of cost incurred by the use of equipment and machinery for the work
- Sub - The reduction in expenses related to external subcontracts, if any.
- Mat - The reduction in the cost of the materials from the planned amount
- Other - The reduction in miscellaneous expenses like transportation, material handling, fees paid to various vendors, agencies, and more.
- Oh - The change in overhead and operation costs that the company bears, relevant to the task
- Profit - The change in profit expected from the work
- Total - Auto-calculated from the values in the row
- Click '+Add Row' to add more line items
- Click 'Save' to save your draft
You can edit the values before submission. Click here to know more.
Upload your estimate
- Click the 'My Estimate' tab
- Click 'Download' at the bottom right to obtain a blank Excel file containing the required field headers.
Requirements of the estimate file
- The Excel file should contain an exhaustive list of tasks for the completion of the change work.
- Each line in the file should contain one line item entry with the appropriate cost code.
- Enter the values for the tasks under the following column headers. Enter the monetary values in US dollars. See above for the description of columns
- Save the Excel file with an appropriate name.
- Upload or drag and drop the file.
Your entries are validated and added to the draft list if there are no errors in them.
Tip:
The entries with errors, for example, the task codes, are shown in red. You can directly double-click on the item and edit it.
- Click 'Save'
The draft estimate is shown:

- Review your draft estimate
- Click 'Reupload' and repeat the process if you want to present a revised estimate
Estimate Details:
The estimate details text box opens as soon as you save your draft estimate file. You can enter the details and descriptions for your estimate and add supporting documents and photos.
- Click the text box and start typing your description.
- Click
 on the top right to add attachments like photos, images, and/or other document files to your description.
 - Click 'Save'
- Click 'Submit' to upload your estimate
Next step:
- General Contractor - Invite subcontractors to submit their estimates for the change. See Request work estimates from subcontractors for more details
- Subcontractor - Click 'Route' to forward the change order to the general contractor
Tip: You can chat with the team members and the participants of the change order at any stage. Click thebutton on the top right. See Chat and collaborate on a CO for more guidance.
Was this article helpful?
That’s Great!
Thank you for your feedback
Sorry! We couldn't be helpful
Thank you for your feedback
Feedback sent
We appreciate your effort and will try to fix the article