Administrators can batch enroll multiple employees at once, ranging from office staff to large field crews, simply by uploading a list. Upon enrollment, Linarc sends an invitation to each employee's email with account activation instructions. Once activated, they can immediately access the web console or mobile app according to their assigned permissions.
You can create the list manually within the system or upload it as a spreadsheet file. For spreadsheet imports, Linarc provides a pre-formatted Excel template. You can easily enter your team's contact details into this template and upload it in one seamless process.
Use the links below to jump to the method you need help with:
Manually Create the Employees List
- Log in to your company management console
- Click 'Employees' on the top and 'Add' on the left
- Click the
 button on the top right
- Click 'Create' inside the box

- Click 'Add Row' at the bottom to create a new entry
- Enter the details of the employee

- Name (First, Middle, Last): The employee's full name, separated into the three designated columns.
- Department Name: The division the employee belongs to (e.g., Operations, Finance, Procurement, or Project Management).
- Employee ID: The specific identification number assigned by your company.
- Title: The employee's official job title within the company
- Phone Number: The employee's contact number, including the country code.
- Email Address: The email address of the user where the account activation invitation will be sent
- Permission level – Choose the role to be assigned to the employee. Access to various web consoles and mobile apps depends on the role. See Employees and Roles for available roles and their privileges.
- Click 'Add Row' and repeat the process to add more employees to the list
- Use the
 icon to remove any inadvertently added entries
 - Once the list is complete, click 'Save' to upload the list
The employees are moved to the ‘Invited’ tab under ‘Employees' and sent the invitation emails.
Import Employees from a Spreadsheet File
The process involves two steps:
Step 1 - Create a List of Employees
- Log in to your company management console
- Click 'Employees' on the top and 'Add' on the left
- Click the button on the top right
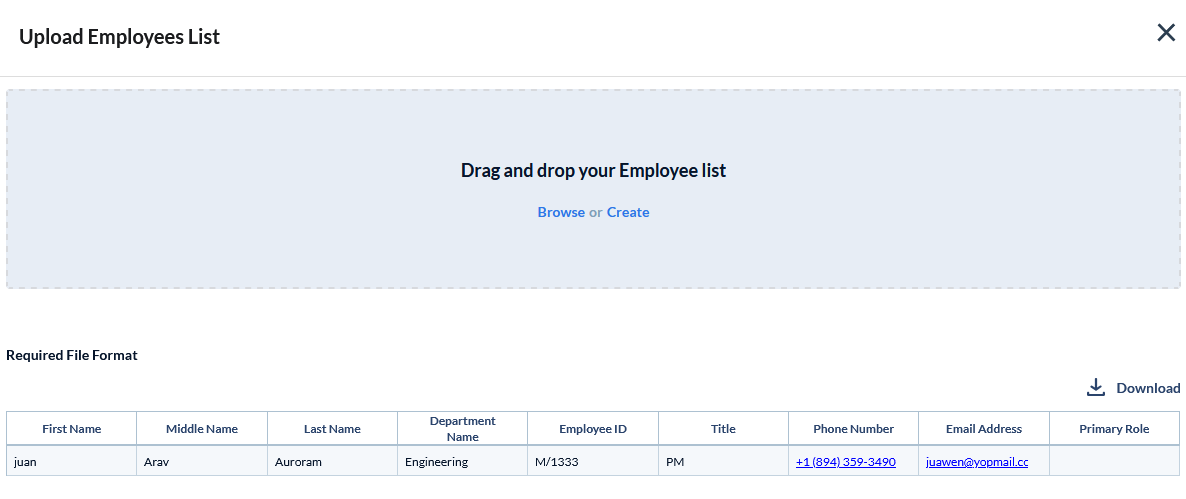
- Click 'Download' to obtain a blank Excel file containing the required field headers.
- Enter the details of the employees one by one in each row.
To ensure a successful batch upload, your spreadsheet must meet the following conditions:
File Structure
- Header Row: Keep the first row intact with the exact column headers as they appear in the downloaded template.
- One Row Per Employee: Every line below the header should contain the details for a single employee. Ensure all fields align correctly under their respective headers.
- File Name: Save the document with a clear, recognizable file name before uploading.
Required Field Details
- Email Address: The email address of the user where the account activation invitation will be sent.
- Name (First, Middle, Last): The employee's full name, separated into the three designated columns.
- Employee ID: The specific identification number assigned by your company.
- Department Name: The division the employee belongs to (e.g., Operations, Finance, Procurement, or Project Management).
- Phone Number: The employee's contact number, including the country code.
- Title: The employee's official job title within the company.
Step 2 - Upload the List to the Management Console
- Return to the 'Upload Employees List' screen
- Click 'Browse' inside the box and navigate to the file
- Alternatively, drag and drop the Excel file into the box
- The employees are added to the draft list under ‘Employees’:
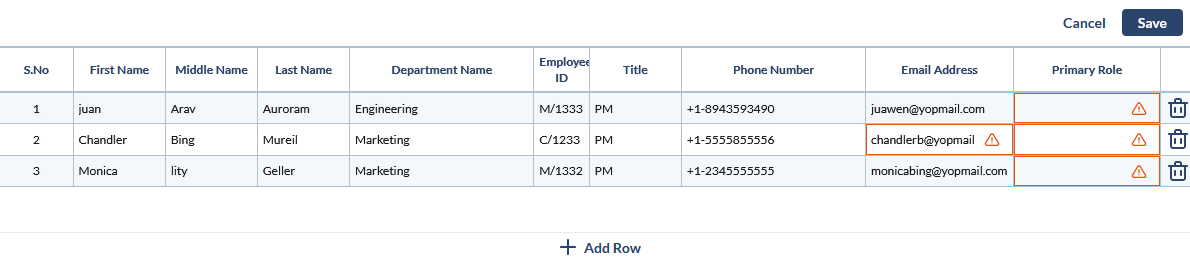
- Your entries are validated and added to the draft list if there are no errors in them. Correct the errors where necessary. Click inside the cell and edit the details as required.
- Select the role to assign to each user from the drop-down under the ‘Primary Role’ column. Access to various interfaces of the console and the features available depend on the role.
- Click the ‘Save’ button at the top right.
The employees are moved to the ‘Invited’ tab under ‘Employees.
An invitation email is sent to the employee with a verification link. The employees, on clicking the verification link, receive an OTP in their email. Once verified, the employees can set up their passwords. After setting up a password, the employees receive their usernames to log in.
Upon their first login, they will be added as active workers to your company. You can view and manage the details of the workers by clicking the ‘Employees’ > ‘Active’ tab in the left-hand side navigation. See Manage Employees for more details on managing workers.
Was this article helpful?
That’s Great!
Thank you for your feedback
Sorry! We couldn't be helpful
Thank you for your feedback
Feedback sent
We appreciate your effort and will try to fix the article