To effectively share and collaborate on your projects, your partner companies—such as subcontractors, architects, engineers, owners, and other vendors—must have an active Linarc account and be listed in your partner directory.
If a vendor you want to work with does not yet have a Linarc account, you can easily invite them to join directly from the platform. Simply provide their basic contact details, and Linarc handles the rest. For added flexibility, you can build a master list of draft vendors first, allowing you to select and send invitations progressively in batches only when you are ready to engage them.
Invitation Process:
- You Send the Invite: You enter the vendor's details to add them to your draft list, then select the vendors you need and send the invitation.
- Linarc Sends the Email: The primary contact at the vendor's company receives a secure invitation email with a verification link.
- The Vendor Sets Up Their Account: The vendor clicks the link, verifies their information, and creates their new Linarc account.
- The Vendor Accepts Your Request: Once their account is set up, they log in to their account and accept your partnership request.
- Ready for Collaboration: The vendor is automatically added to your partner directory, and you can instantly start including them as collaborators on your projects.
Note: The steps below are for vendors who do not have a Linarc account. If the company is already registered on Linarc, you can quickly add them to your directory by selecting their profile and sending an invite. See Manually Add Vendors for details.
To enroll your partners
- Click 'Vendors' at the top of your admin console, then select 'Invite' from the left menu.
- Click the
 button at the top-right.
 - Click the
 button to open the list of vendors already added as a draft list, but yet to be invited.
 - Click 'Upload Vendors.'
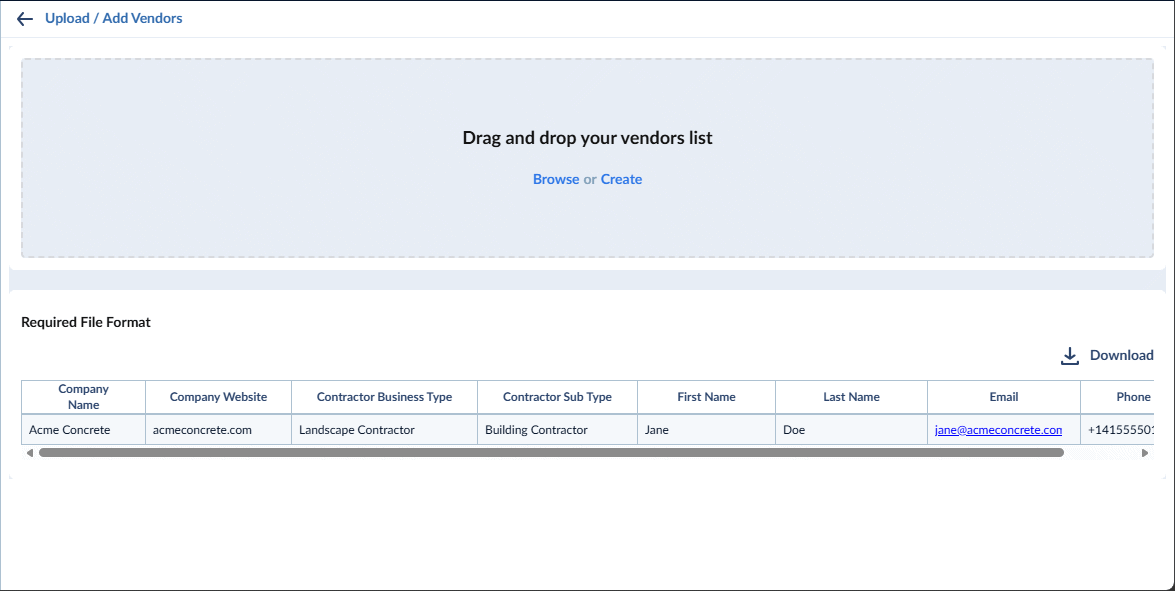
You can add the vendor entries in two ways. Use the links below to jump to the section you need help with:
Add Vendors One By One
- Click the 'Create' link in the 'Upload Vendors List' screen
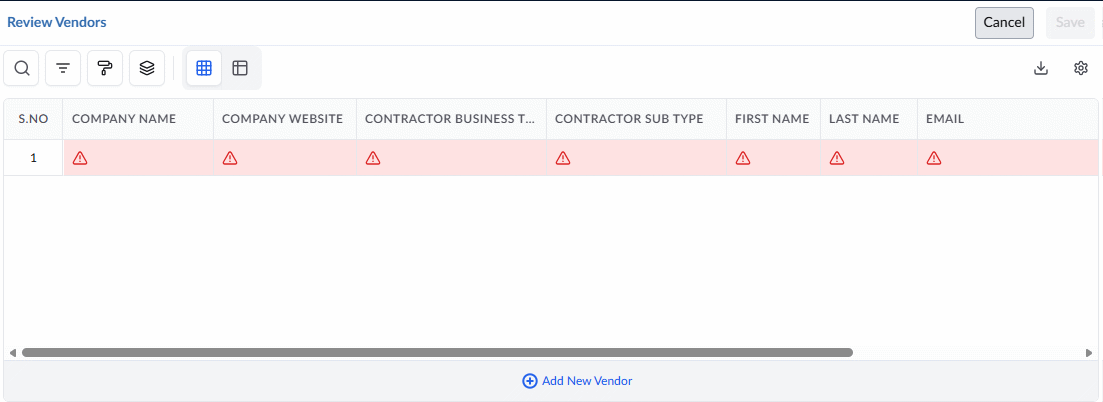
- Enter the details of the vendor to be added to the list in the first row:
- Company Name: The name of the contractor, architect, or owner/developer company you want to send the invitation to.
- Company Website: The website address of the company.
- Contractor Business Type: The company type (e.g., subcontractor, architect, owner/developer, consultant, material vendor). Click inside the cell and select the business type from the options.
- Contractor Sub Type: The subclassification of the company type (e.g., the specific trade, if the company type is a subcontractor). Click inside the cell and select the subtype from the options. The available options depend on the selected contractor type.
- First Name and Last Name: The full name of the company's representative.
- Email and Phone Number: The contact details of the representative.
- Actions: Contains controls to remove entries added by mistake.
- Click 'Add New Vendor' at the bottom to add a new blank line and enter the details of additional vendors.
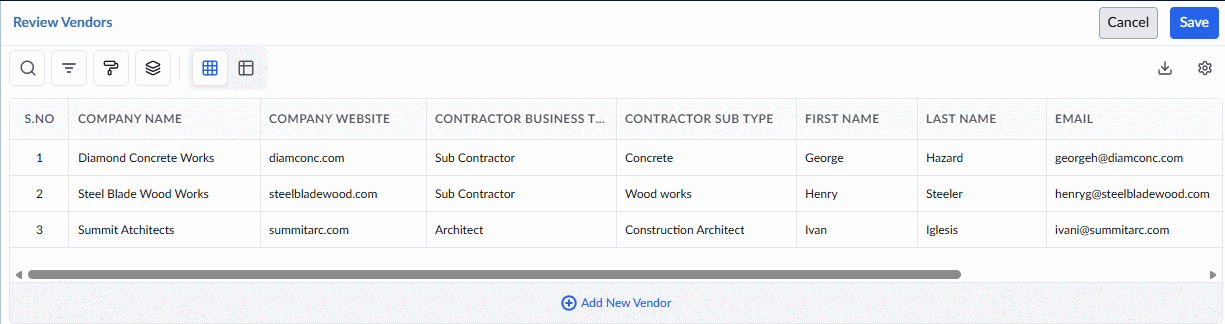
- Click 'Save' after you have add all required vendors
Next Step: Jump to Send Invitations to the Vendors.
Bulk Import Vendors from an Excel File
The process involves two steps:
Step 1 - Create a List of Vendors
- Click 'Download' in the 'Upload/Add Vendors' screen to fetch a blank Excel file containing the required field headers.
- Enter the details of the vendors one by one in each row.
Important: To ensure a successful batch upload, your spreadsheet must meet the following conditions:
File Structure (Header Row): Keep the first row intact with the exact column headers as they appear in the downloaded template.
One Row Per Company: Every line below the header should contain the details for a single company. Ensure all fields align correctly under their respective headers.
File Name: Save the document with a clear, recognizable file name before uploading.
Required Field Details
- Company Name: The name of the company.
- Company Website: The website address of the company.
- Contractor Business Type: The company type (subcontractor, architect, etc.).
- Contractor Sub Type: The subclassification (e.g., the specific trade).
- First Name and Last Name: The full name of the company's representative.
- Email and Phone Number: The contact details of the representative
Step 2 - Upload the List to the Management Console
- Return to the 'Upload/Add Vendors List' screen.
- Click 'Browse' inside the box and navigate to the file. (Alternatively, drag and drop the Excel file into the box)
The companies are added to the draft list:
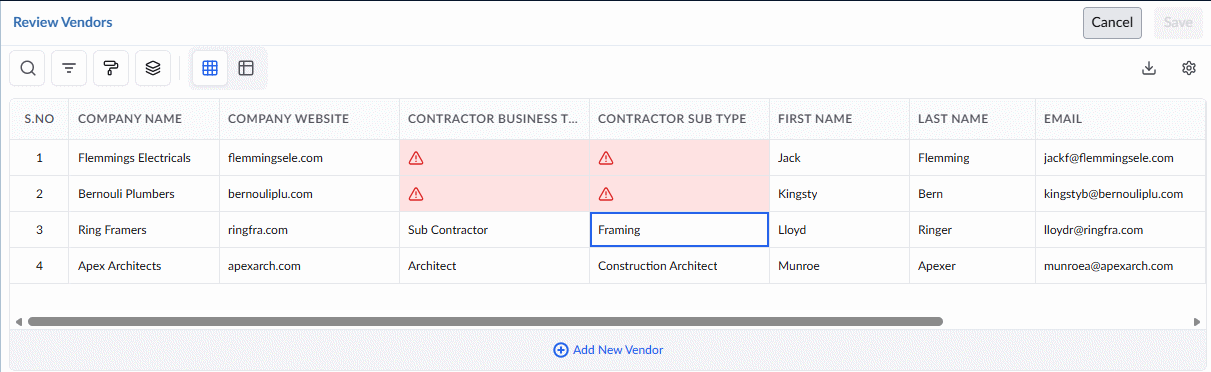
Any values that were not in the correct format and could not be fetched by the system from the Excel file will appear blank
- Enter or correct any missing values directly on the screen, either by typing or selecting from the drop-downs.
- (Optional) Click 'Add New Vendor' at the bottom to add a new blank line if you need to manually add more vendors.
- Click 'Save' after you have reviewed and added all required entries.
Send Invitations to the Vendors
Once all vendors are added to the draft list, you can select which vendors you want to officially invite to enroll in Linarc. This allows you to send invitations progressively in batches—meaning you can create a master list of vendors and invite them only when required.
To select and send invitations
Ensure you are in the 'Review Vendors' screen. If not:
- Click the buton at the top-right.
- Click thebutton to open the draft list of vendors yet to be invited.
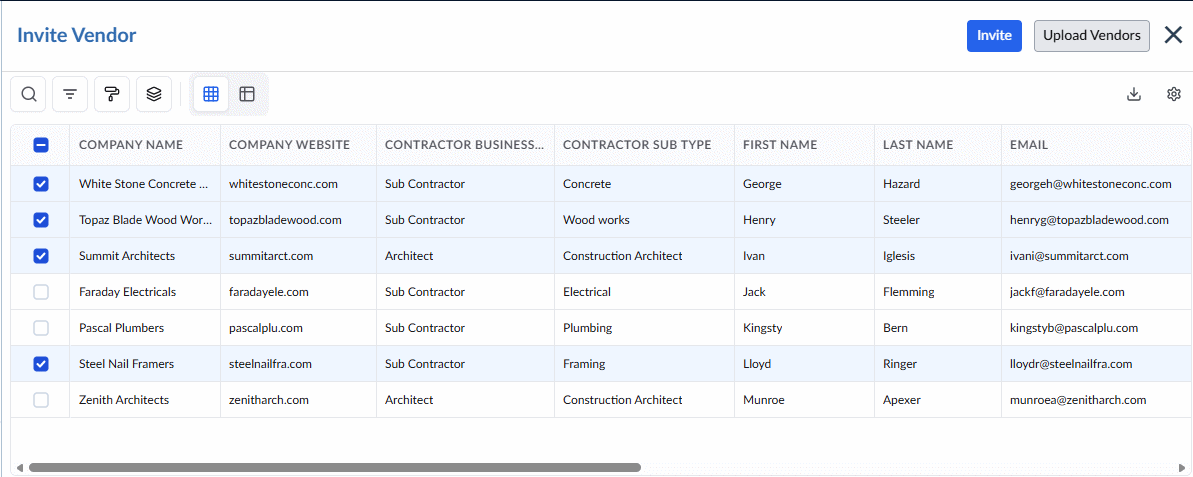
- Select the vendors (by clikcing the checkboxes in their serial numbes) you want to send invitations to, at this time
- Click 'Invite' at the top-right
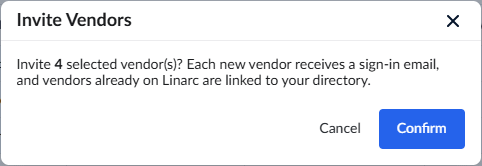
- Confirm your action for Linarc to immediatly send the account verification emails to the selected vendors.
Once you send the invitations, the rest of the onboarding process is in the vendor's hands:
- Email Delivered: Linarc automatically emails the company's primary contact with setup instructions.
- Account Setup & Acceptance: The invitee creates their account, logs into their Linarc console, and accepts your partnership request.
- Ready for Collaboration: Once they accept, they are instantly added to your active vendor directory and become available to join your project construction teams.
Was this article helpful?
That’s Great!
Thank you for your feedback
Sorry! We couldn't be helpful
Thank you for your feedback
Feedback sent
We appreciate your effort and will try to fix the article