The 'Permits' module contains details of building permits obtained by the collaborating contractor companies for the project from the county/state authorities.
Project managers of different construction companies, including the general contractor and the subcontractors collaborating on the project through Linarc, can add the details of their building permits. The details are shared among all contractors, architects, engineers, consultants, and the owner involved in the project. This enables the general contractor to ensure that all SCs have valid permits to carry out the work assigned to them.
Open the 'Permits' screen
- Ensure you are on the 'Permits' screen within the 'Project Information' module of the project. If not:
- Click the main menu at the top-left
- Click 'Information' under 'Project' in the menu drop-down.
- The 'Project Information' screen opens by default.
- Select 'Permits' on the left.
The 'Permits' interface shows the list of permits of all participating contractor companies:
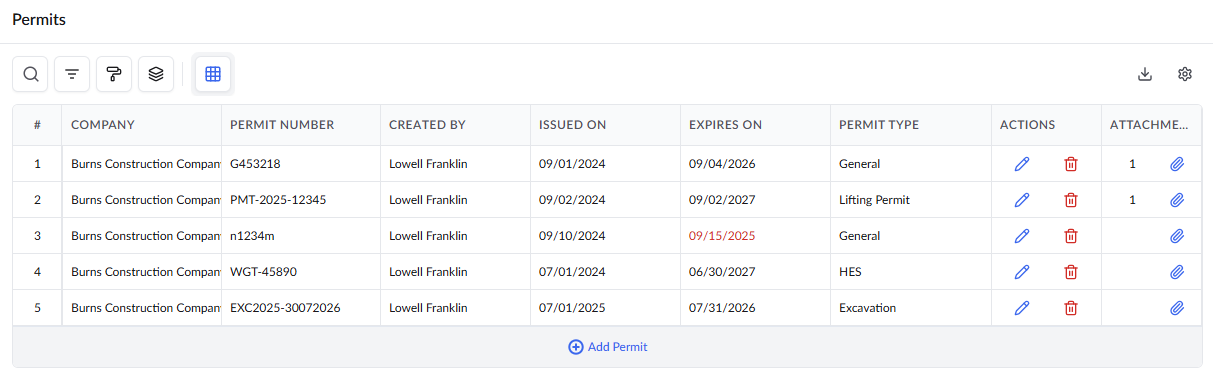
- Company - The contractor company that obtained the permit for the construction project
- Permit Number - The serial number assigned to the permit by the issuing authority
- Created by - The user who uploaded the permit.
- Issued on - The date from which the permit is effective
- Expires on - The date until which the permit is effective. If the expiry date is imminent, it is shown in red, alerting you to renew if required.
- Permit Type - The kind or the permit, depending on the nature of work carried out by the contractor. Examples include Electrical, Plumbing, Mechanical, etc.
- Actions-
- Click the 'Pencil' icon to edit the details of the permit
- Click the 'Delete' icon to remove the permit form your project
- Attachments - Allows you to add supporting materials such as images or PDFs to enhance the topic content.
Search, Filter, and Sorting Options
- Click the magnifier icon and use the 'Search' box at the top left to find an entry using any value from the table as search criteria
- Click any column header to sort the rows in ascending or descending order based on that column's data.
- Click the cog wheel icon at the top right to adjust the display density and customize the display and order of the columns
- The options at the top left allow you to filter the entries, create nested groups of entries, highlight cells and manage personalized and customized views of the table. Use the links below to learn more:
Add a new permit
- Open the 'Permits' interface as explained above
- Click the 'Add Permit' button
Enter the details of the permit you obtained for the project:
- Type - The kind of permit. Select the type from the dropdown.
- Permit number - The serial number as mentioned in the issued permit
- Issued on - The date of issuance of the permit. Click inside the field and use the date picker to enter the issuance date.
- Expiry date - The expiry date mentioned in the permit. Click inside the field and use the date picker to enter the expiry date.
- Permit Type - Click the drop down and select the category of the permit issued
- Click
 icon in the actions column
 - Click
 icon to add related images or PDF files
The permit is added to the list and is visible to all participant contractors.
Was this article helpful?
That’s Great!
Thank you for your feedback
Sorry! We couldn't be helpful
Thank you for your feedback
Feedback sent
We appreciate your effort and will try to fix the article