Add and Manage submittals
- 5 Minutes to read
Add and Manage submittals
- 5 Minutes to read
Article Summary
Share feedback
Thanks for sharing your feedback!
General contractors and subcontractors can add submittal entries for the tasks and deliverables they want their subs and vendors to present their submittals. You can set up a custom workflow for the submittal life cycle, which governs the proper routing of the submittal for review and approval or revision at successive stages to respective parties.
Use the following links to jump to the section you want help with:
Open a Submittals Package
- Open the management console of the project
- Click 'Submittals' on the top
- Select 'Registry' on the left
- Open the package into which you need to add a submittal entry.
.png)
The submittal package screen shows the entries included in that package with their details:
- Spec Section - The section of the construction specification book that covers the category of tasks, deliverables, and materials to which the submittal item corresponds.
- Rev - The number of times the submittal has been subjected to revision
- Title - The label of the submittal.
- Submittals Type - The form of the submittal item requested/presented for that submittal entry.
- Assigned to - The subcontractor responsible for the submittal.
- Created on - The date at which the submittal entry was added.
- Due Date - The date on or before which the submittal should be completed and closed.
- Status- The progress state of the submittal entry. The possible values are:
- DR = Draft - The submittal is saved as a draft and is yet to be published by the GC
- OP = Open - Awaiting response from a responsible party in the workflow
- IP = In Progress - The submittal is published and routed to the next responsible party
- AP = Approved - The submittal is approved and closed
- RE = Rejected - The submittal was rejected by the approver and closed
- RS = Revision - The submittal has been recommended for revision and is currently awaiting an update from the submitter
Sorting options - Hover your mouse over a column header and click the arrow that appears to sort the rows in alphabetical order of items in that column.
Search and Filter options - Use the Find, Filter, and Table customization options on the right to search, filter, add/remove columns, etc. See Search, Filter, Column Customization, and Table Views for guidance on this.
See here to learn how to Create and Manage submittal packages.
Create a submittal entry
- Open the submittal package as explained above.
- Click the
 button on the top right.
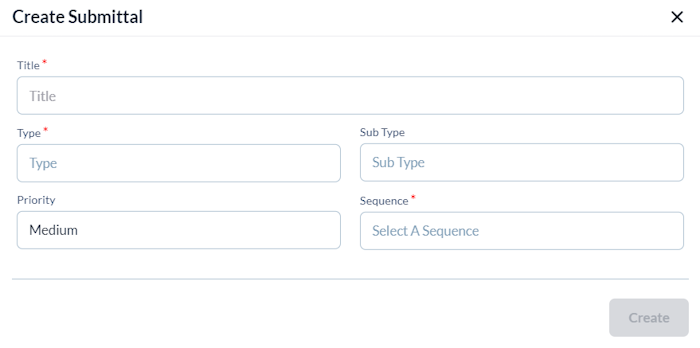
- Title - Enter a label for the submittal, shortly describing its purpose. (Max. 150 characters)
- Type- The form of the submittal, for example, shop drawing, cut sheet, material sample, technical specifications, etc.
- Choose the type from the drop-down
- Sub Type- The further classification of the submittal, depending on the selected type.
- Choose the sub-type from the drop-down
- Sequence- Specify the category of the submittal. Submittal categories are defined as a master list at your company level. The submittals will be sequence-numbered in a series, depending upon the category. This number lets you quickly identify, and filter/review submittals of a particular type. (Optional)
- Choose the category from the drop-down. If you do not see the category, you want to choose, contact your administrator.
- Priority - The criticality of the Submittal. Choose 'High' for the submittals to be answered quickly to avoid schedule and budget losses.
- Click

The details tab opens:
.png)
Creating a submittal entry involves two steps:
Step 1 - Add details, due dates, and attachments
- Ensure that you are in the 'Details' tab
- Enter the following additional information for the submittal
General details:
- Location - The portion/area of the building where the associated task is executed.
- Specification Section - The drop-down shows the sections or code numbers assigned to tasks and deliverables of various work categories in the spec book. Choose the code that covers the item for which the submittal is requested.
- Associated Task - Choose the actual task or the deliverable for which you want the submittal.
- Due Date- The date on or before which the submittal should be closed.
Description
- Click on the description text box and start typing your response.
- Click
 on the top right to add attachments like plan drawing with markups, photos, images, and/or other document files in the description.
.png)
You can upload items in two ways:
Attach plan drawings with/without markups
The 'Select From Plans' option lets you create markups on a plan drawing and upload it as a submittal item.
- Choose ' Select From Plans' in the 'Attach Files' dialog.
- Select the plan you want to use
- Create markups if required to explain the requirement in more detail. See Markups for guidance on creating different types of markups on the plan drawing.
- Click 'Share' to affix the plan drawing/markup to the submittal entry.
- Repeat the process to add more plan sheets and markups
Attach photos or documents
The 'Browse' option lets you upload PDF or text documents like shop drawings, cut sheets, process/specification/installation documents, brochures, reports, etc., image files like photos with/without markup, and more as your submittal items.
- Choose 'Browse'
- Browse to the required image or document file from your local storage and click 'Open.'
- Repeat the process to add more images or documents.
The plan(s)/photos/documents are added to the submittal.
Step 2 - Configure the workflow
- Click the 'Workflow' tab.
.png)
- Select the suitable workflow template from the dropdown menu.
Once chosen, the actions and the responsible company types in the workflow template are shown as a list.
- Select the responsible companies and enter the permissible days for each step.
- Click the 'Save' button to proceed.
See Set up a workflow to a submittal for more guidance.
Note:
In the submittal review process, the assigned reviewers/approvers can either respond by themselves or forward the submittal for review to another reviewer if required. The workflow is automatically updated for the new steps if new members are added to the review process.
Add Watchers (Optional)
The 'Watchers' pane allows you to specify your team members to notify them of the submittal progress and details. Linarc sends a notification to the persons on each activity on the submittal. If given access, they can view the details at each step from their Linarc project consoles.
To add watchers to a submittal,
- Start typing the name of the person in the text box under 'Watchers' and choose from the options.
- Click the 'Add' button.
- Repeat the process to add more watchers.
See Add and Manage Watchers for more guidance.
Forward the submittal request
Once the details are filled in and the workflow is set, you can route the submittal to the responsible party for further processing, depending on the workflow setup.
To forward the submittal to the next step:
- Click the
 button
 - Click the 'Workflow' tab to see the current status and upcoming workflow stages of the submittal.
Tip:
You can chat with the team members and the participants of the submittal at any stage. Click the.png) button on the top right. See Chat and Collaborate for more guidance.
button on the top right. See Chat and Collaborate for more guidance.
button on the top right. See Chat and Collaborate for more guidance.You can track the activities performed on the submittals from the Activity log pane. See View activity log of workflow item for more guidance.
Was this article helpful?