The Project Management Console – Main interface
- 3 Minutes to read
The Project Management Console – Main interface
- 3 Minutes to read
Article Summary
Share feedback
Thanks for sharing your feedback!
The project management console is the nerve center providing access to various features and lets PMs perform the activities to steer a project from start to completion. The intuitive interfaces allow PMs to manage the schedule of tasks, the budget and cost accounting, and manage labor and equipment resources, materials, submittals, RFI's, change orders, punch lists, and more. The integrated collaboration module serves context-based conversations with field workers, team members, and participants from other companies for real-time clarifications, announcements, suggestions, etc.
To access the management console of a project
- Login to your PM account
- Your projects overview console opens with the list of projects you are associated with.
- Click the name of the project under 'Projects' > 'My Projects.'
- Alternatively, move your mouse over the project name and click the
 button to open the project management console in a new tab.
- Alternatively, move your mouse over the project name and click the
.png)
The name of the project is shown on the top left.
The menu items on the top provide you access to various modules for project management. The options on the left take you functional screens of the chosen module.
Please note that depending on your role, you can access only those items you have permission. The following list covers all possible menus:
- Project- General project pertinent details, collaborators, project team, permits, etc. Also provides access to the project's cloud repository and spec book. The sub-menus include:
- Information - General details of the project. The general contractor can edit these at any time. See Edit Project details for more details.
- Permits - Upload the permits you obtained for the project from various local, county, and state authorities to share with other collaborators. See Add permits for more details.
- Project Directory - A register of all collaborating companies. These include other contractors, architects, engineers. etc. See Project Directory for more details.
- Team- A register of members of your organization participating in the project. This includes fellow project managers, project engineers, schedulers, estimators, and more. See Add off-site staff for more details.
- Files - The project's online storage that acts as a cloud repository for project-related digital assets, like various documents, contracts, plans, photos, etc. The Cloud storage also allows you to share the assets selectively with other collaborators of the project. See Centralized File Storage for more details.
- Spec Book - Manage project specifications. See Project Specifications for more details.
- Site - Manage site parameters like setting up a geofence, configuring the work days and shift timings, assigning foremen and crew, viewing daily job site/field reports, managing equipment requests, and more. See Site and Crew Management for more details.
- Plans - Manage plan drawings of the project and share them among the team and collaborators. See Plans Management for more details.
- Schedule- Manage WBS-based project schedule, assignment of tasks, schedule baselines, etc. See The Scheduler for more details.
- Budget - Manage project budget, cost estimates, SOV, job cost journals, and more.
- RFI - Create, manage, route, review, answer, and publish requests for information (RFI) at various project states. See RFI for more details.
- Change Order - Create, manage, forward, review, and approve change orders, depending on your role in the project. See Change Orders for more details.
- Submittals - Create submittal packages, request submittals, present submittals, and review, and approve received submittals, depending on your role in the project. See Submittals for more details.
- Punchlists - Create punch lists and assign them to appropriate contractors.
- Feeds - View and manage image feeds and task progress images from the site.
The perpetual buttons on the top right of the interface allow you to view the notifications, update your user profile and settings, open the online user guide, open your projects overview console, and log out.
| - | Opens the global search bar. Search any project-pertinent item you manage by entering its name/subject in full or part. | |
| - | Takes you to the projects portfolio console that lets you view and manage all projects assigned to you. See Project Portfolio for more details. | |
| Opens the in-app chat window to converse with the workers on-site or offsite, belonging to various companies in real-time. See Chat and Collaborate for more details. | ||
| - | Opens the in-app help widget with the online help page relevant to the interface you are in. The widget contains shortcuts to access our full knowledge base to get help on any task. | |
| - | Opens the notifications widget to view the messages auto-generated by Linarc for various activities on the project, that require your attention. The number of new/unread notifications is indicated beside the bell icon. See View Notifications for more details. | |
| - | Your user icon with profile picture. Click the icon to update your profile, profile settings and log out of the console.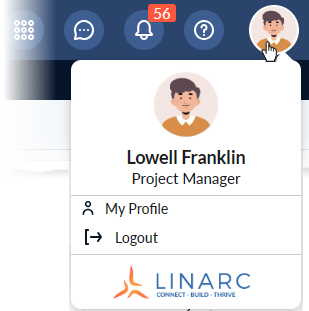 |
Was this article helpful?